3D Printer Shootout - $600 Printrbot vs. $20,000 uPrint SE Plus
First, let's level set with a disclaimer. I am a smart enough person but a total beginner at 3D printing. I've been 3D printing for about two weeks using a Printrbot Simple Metal from Amazon that I got for US$599. Other than Amazon affiliate links (buy from my links and you buy me tacos!) I don't have ANY relationship with Printrbot or anyone in the 3D Printing space. I'm unaffiliated. This "shootout" is an interesting experience. I'm sure I did something wrong, or perhaps my partner in crime on this experiment, Brandon Potter, missed a step. Who knows? But this is how it went down.
Brandon saw that I was doing some 3D printing and mentioned they had a <$22,000 3D printer at his work and what did I think about doing a comparison? I had been having trouble printing with success, ruining at least 2 out of 3 prints, but recently got my Printrbot dialed in nicely. '
Here's my investment so far both in time and money.
- Printrbot Simple Metal from Amazon that I got for US$599
- Raspberry Pi and Raspberry Camera to watch my prints and do time-lapse videos with Octoprint. Figure $60.
- A spool of RioRand 1.75mm PLA Filament in Black for $28.
- Digital Calipers for measuring stuff. $20.
- And a number of printed parts to improve my 3D printer's performance including:
- Raspberry Pi mount and camera holder
- Printrbot Simple Metal filament spool holder
- Feet for the Printrbot (plus little rubber feet-bits)
- Uline brand blue tape. Works WAY WAY better than other blue tapes. This made a HUGE difference. $15
So I'm into it for $722 and my time. I did NOT use a Heated Bed for my Printrbot Simple Metal but I am told it's a great upgrade.
Here's Brandon's company's outlay in his words:
- uPrint SE Pro Printer and Dissolving Bath – about $22,000
- 1 Spool of Model Material (Black) – $205.00 (produces 42 cubic inches of printing)
- 1 Spool of Support Material – $200.00 (42 cubic inches worth)
- Box of Build Plates – $125.00 for 24 (you need one for each print, so it costs about $5.20/each)
- Soluble Concentrate – $149.00 for 12 bottles (dissolves support material, aka fancy drain-O)
- Warranty Support – $2,000/year – because it does break from time to time.
- Brandon says - Add a little bit of shipping, and for a mere $25K you’re ready to print your very own coffee cup.
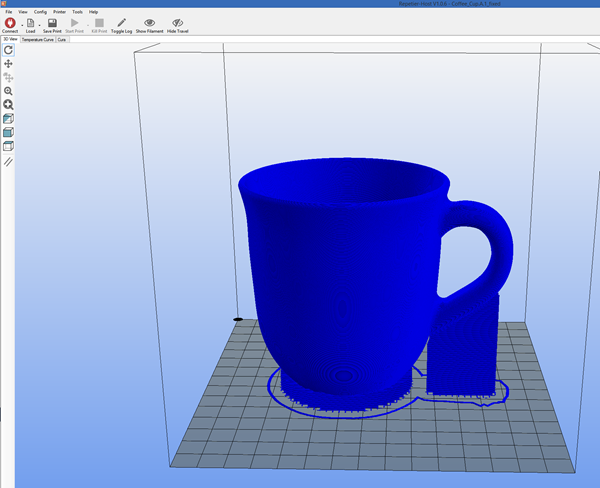
We decided to print a coffee cup. I don't plan on drinking from it because who knows if the plastic will leech off, but it seemed like an interesting and common object. As a 3D model it has some nice curves, the handle overhang is a small challenge and it's something we can easily compare.
I printed one on my Printrbot and Brandon printed one on their Stratasys uPrint SE Pro. Then Brandon mailed me his cup and I'm sitting here holding them both in my hands.
Here is a timelapse video of my cup printing. My 0.2mm print took about 7 hours and this video is 90 seconds. I used Octoprint and the Raspberry Pi to create the video.
I downloaded the Coffee Cup model from Thingiverse as an STL 3D model. I ran the STL model through the Microsoft 3D Printing NetFabb online service to make sure the model was watertight. Then I loaded the result directly into Repetier and used Cura to slice the model into individual instructions for the printer. I made one adjustment to the slicing settings, telling it to make a "support structure" when it sees an overhang over 30 degrees. I was concerned about the cup's handle. Other than that one settings change which resulted in the support being added (which is easily pulled off after the print) it was a "printing as is." Brandon's model also used a support structure to print the cup and keep the handle stable so we decided this was pretty typical. He also printed on his pro printer with no changes.
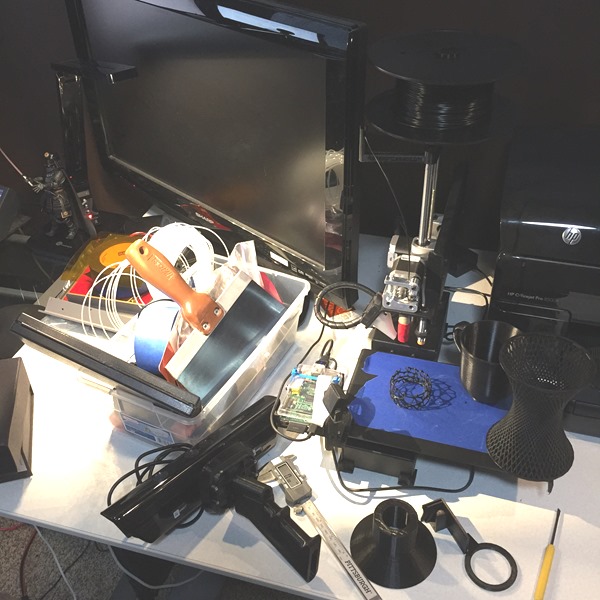
Here is a picture of my setup. There's my printer on the right with some stuff I've made and my box of tools/crap on the left. You can see the spool, the printer (the red lipstick looking thing is where the hot plastic comes out), the Raspberry Pi and the tape that I print on. I can print objects up to 6 inches on a side, so a big 6 inch cube. If I paid more money I could get the 10 inch model, but so far for my hobbies I'm happy with that size. I can break things up and assemble them with acetone or bolts if I want to make larger models. One fellow 3D-printed a whole full-sized motorcycle with a small printer and assembled the parts.
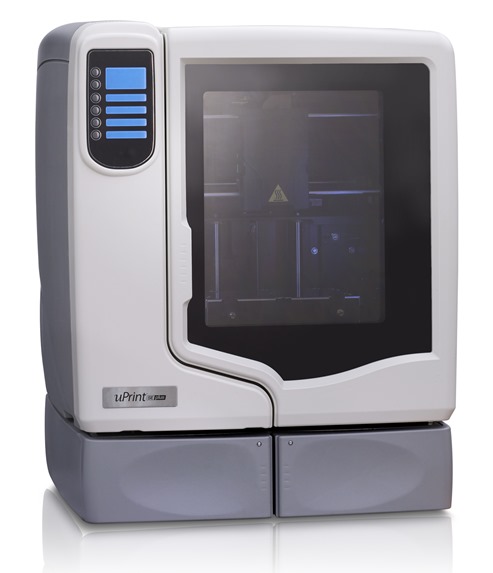
Here is Brandon's printer. Again, $600 vs. $25000.
By the way, is this a silly comparison? Perhaps. But no more than a Tesla vs. a Challenger Hellcat. Actually, I think my printer is a Geo Metro. But I get great mileage!
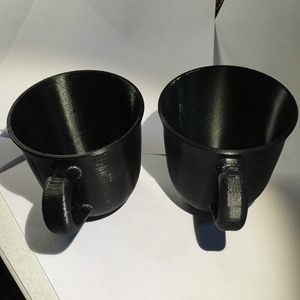
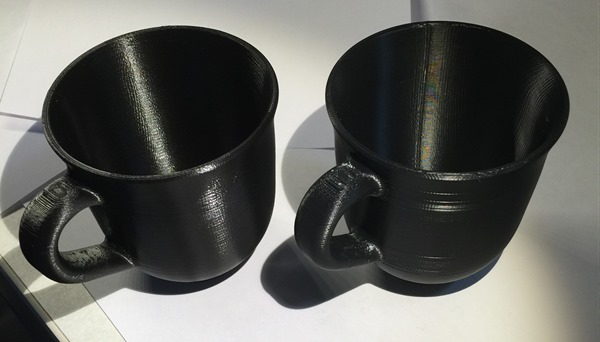
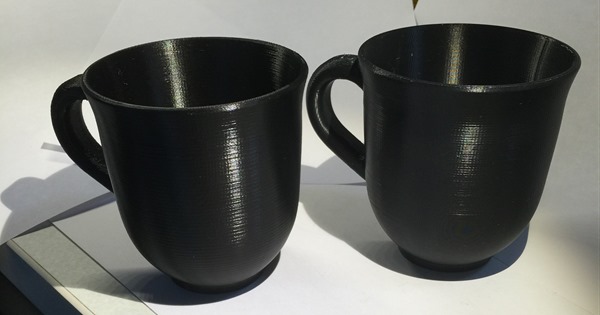
Ok, here's the prints. Feel free to click to zoom in to make your decision. Which cup came from which printer?
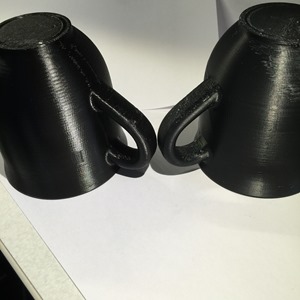
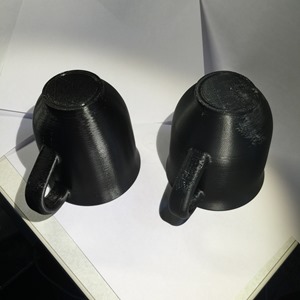
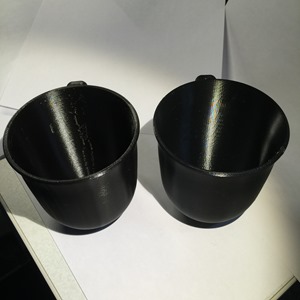
Here's slightly larger pics. Note I am not/have not moved the cups side to side. Left/right is consistent for this photo series.
Which is which?
The $599 Printrbot Simple Model printing at 0.2mm is on the left. The $20k uPrint SE Plus printing at 0.1mm is on the right.
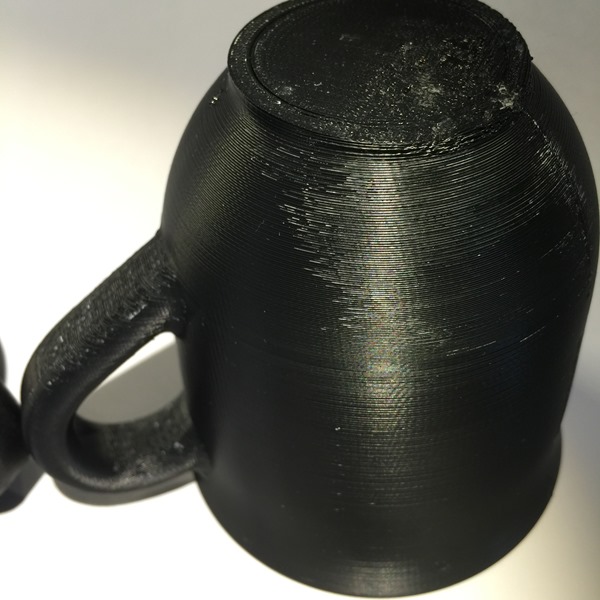
The uPrint's base was messed up somehow. A bad start perhaps, but unfortunate as it's supposed to just work since Brandon used the one-time-use custom bases that the uPrint comes with. He also used the dissolving bath to take the white support structure off. You can see some of the white still there, perhaps it wasn't in long enough. My print had supports but I just pulled them off with my hands. Of course, if you have an intricate print with small parts that's not always possible. This is a very simple object, to be clear. It's not interlocking gears or something.
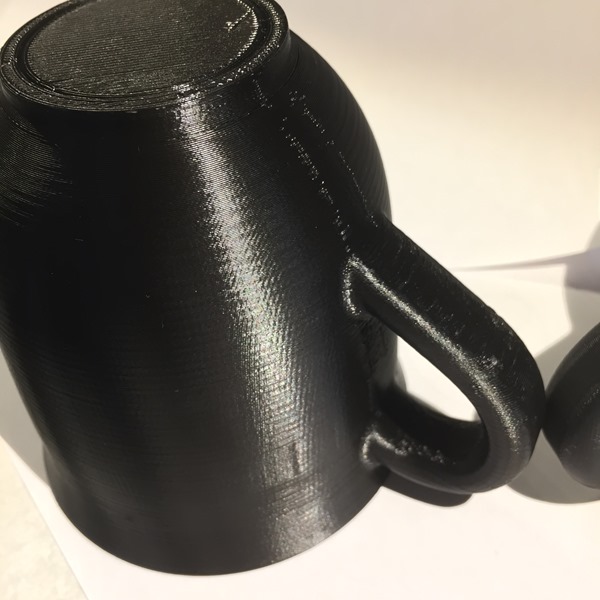
Here's the uPrint cup. Brandon said it took 8 hours and 22 minutes.
Here's the Printrbot's cup. Note the "Z scar" (an artifact from the printer moving up the Z-Axis) on the print? On my print it ended up by the handle, but on Brandon's it ended up on the side of the cup, marring the print, in my opinion.
What's the takeaway? If we assume that I have a totally dialed-in well calibrated super cheap consumer/hobbyist 3D Printer and that Brandon has a $20k professional 3D Printer that's maybe got some calibration issues, they seem very comparable.
However, in real one-time costs my cup cost me 21.02 meters of filament, costing me perhaps $2 maybe a little more if you count the few pieces of tape. For Brandon and his Pro printer, in direct costs, he used $23.62 in model material, $2.06 in support material, and $5.20 build plate, for a total of $30.88 for this cup.
Naysayers will say that this isn't a great model to have chosen. Clearly my little Printrbot Simple Metal can only make things of a certain size, but it's clearly fair to say that it's a surprisingly competent printer when it's calibrated well. Additionally, if I were a 3D modeling shop with a Pro printer, I think I would definitely pick up a few sub-$1000 printers for basic stuff as the big printers may be costing you money. If I was a small business I would really do my homework before buying a pro printer that claims to be problem- and maintenance-free. Go read Brandon Potter's account of his "pro print" and compare notes!
NOTE: This post is intended in no way to talk up Printrbot nor to talk down Stratasys. It's a simple one time anecdote as it happened, using a simple model.
What do you think, Dear Reader?
Sponsor: Big thanks to Infragistics for sponsoring the feed this week! Responsive web design on any browser, any platform and any device with Infragistics jQuery/HTML5 Controls. Get super-charged performance with the world’s fastest HTML5 Grid – Download for free now!
About Scott
Scott Hanselman is a former professor, former Chief Architect in finance, now speaker, consultant, father, diabetic, and Microsoft employee. He is a failed stand-up comic, a cornrower, and a book author.
About Newsletter
I would love to know if your win (IMHO) was from proper preparation and experience or from the need to "over engineer" the setup.
There are definitely some take aways for the boutique vs mass production debate. Further study is required.
I am still shocked everytime I analyze a print. It's very much on par with machines way outside it's league. Patience is a virtue, prints are slow but I consider them flawless for the cash investment.
In no way am I affiliated to printrbot; nor am I willing to say 3d printing is easy. Just chiming in that the printrbot results are not a single geeks luck. It's repeatable.
I have quite some experience with Stratasys printers myself (from my old job) and I honestly think your cup is looking as good as anything we produced on the Stratasys.
But, what is the meaning with the blue tape, on your bed? Do you remove the tape after each print, to get the model off the plate?
Nicolai - Yes, it also gives the filament something to stick to. I replace it each time.
reading your article today and see the cup you've printed. Please don't drink from it, because most filament use plastic with BPA see: FDA: Bisphenol A (BPA): Use in Food Contact Application.
Maybe there is some BPA free filament which can be used? This is a little of topic, I know, but I wanted to warn you...
But, nice article ... as always. Greetz from Germany.
Taulman3d.com is working on selling Nylon 680, a medical grade nylon approved by the FDA. They are also working on selling Nylon 910 which is a food grade nylon and is approved by the FDA. Both plastics are non-leaching and the 680 can survive autoclave sterilization processes.
I updated my old review that compared the same uPrint SE to an ultimaker with the same "not-so mixed" feelings in the end...
http://www.tridimake.com/2014/03/quick-comparison-pro-versus-low-cost.html
ROI is definitely better for small items with a cheap 3D printer.
Try printing a working transmission in one go. That is what the $20,000 printer is for. To do what is impossible using any other known manufacturing process. Or to actually get anything of Emmett's to print well ;P
I do agree that as far as filament FDM is concerned you are not getting all that much more as price increases, steep diminishing returns.
Still some folks buy dell computers and pay 4X what they would if they built it themselves from parts or bought white box, but, they get licenses, warranty, support, etc. That adds up for some folks and not for others.
While agree that home 3d printers can do amazing things, some on par with the more expensive industrial machines, this contest was hardly apples to apples. The model you choose was designed with the limitations of home 3d printing in mind. Those overhangs on the handle you worry about ain't nothing. Also you're printing in PLA, they're printing in ABS, their mug is much so of course the home printer was going to make a good showing. more likely to survive the dishwasher than yours.
Why not try a model designed by engineers for the uPrint and without modifying it try it on the printrbot and see how it holds up there in terms of floating overhangs and engineering level precision? You've gone and compared a Geo to a Humvee on a city road when to get an honest comparison you need to take the contest off road now.
Must be an upgrade to software ... ;).
But I think the biggest oversight of this whole experiment is that the uPrint is likely printing in a ABS (or similar compound) material and Printrbot is printing in PLA.
Im not detracting away from the quality of the print, but its apples and oranges in this regard.
I have battled and failed ABS prints that I can easily and repeatedly produce in PLA with excellent results. The fact the uPrint has a heated enclosure and does not allow for the operator to open it while it is printing is something that should not be overlooked, and if you were to print a 150x150x150 ABS model in the uPrint I wouldn't be suprised if it printer printed first time.
buy groceries. Let’s put things into context.
Don't get me wrong, I'm not bashing/hating on the printbot, but you guys have to open your eyes to understand the real difference that the two platforms offer. It's like trying to compare Microsoft Paint to Adobe Photoshop...YES there really are that many levels of difference between single extrusion and dual extrusion with a supports systems that dissolves away.
How fast did your print the same model? Also I saw the valentine pendants (very cool) how long did these took, and did you have to design it yourself?
I build pro grade printers that use the more challenging materials like nylon, polycarbonate etc. I have found it hard to properly photograph some prints.
Another thing I was surprised is the long print times for the Stratsys. 5 hours?? You mean to tell me a Stratsys cant print nice ABS plastic at 200mm/second print speed and above?
If you are printing decorations or toys then stick with a generic printer. It will be much cheaper. If you want to replace machined aluminum parts for 3D printed parts with a much cheaper post-machining cost for final part accuracy, then a good 3D printer will save you a lot over time.
Sorry to break it to you, but StrataSys does not have a monopoly on dual extruders. Lots of other much more reasonably priced machines also have them. They can easily print soluble supports with HIPS or PVA just like StrataSys.
The heated build chamber is a different story. Somehow, someway, StrataSys managed to get a patent on something here that should not have been patentable. Patent law states that patentable ideas must not be a simple and obvious enhancement to a product. Heating the build chamber falls squarely into that category. I suspect they only way they got away with it was to describe a very specific way of doing so. Some people have looked at this issue and realized that there are different ways to heat a build chamber and the StrataSys patent is not valid for protecting the general idea of heating the build chamber. Nevertheless, most manufacturers choose to avoid tangling with StrataSys lawyers because they can't afford a legal defense against a such a large corporation even if they are in the right.
The maker community is basically unimpeded by this legal garbage. If I or anyone else wants to add a heated build chamber to their printer for their own use, there is absolutely nothing stopping them.
As far as print quality is concerned, I have found that about 90% of that is directly traceable to the operator. A $20K printer does not compensate for someone who does not know or care about what they are doing. The pictures in this article demonstrate this quite clearly. The "Z-scar" on the StrataSys cup is outrageous for a product of this price. But yet, it's not really the fault of the printer - it's the operators fault for not having the retraction properly calibrated. The StrataSys ABS filament also looks like is had absorbed some moisture. Experienced makers know that ABS has to be protected from ambient mositure. The trained monkeys at the UPS store who run the uPrint machines at the UPS store either don't know or don't care. 3D printing is not their passion.
Citing better dimensional tolerances is also pretty much invalid. People who have built their own printers know all about the fine nuances of tramming and calibrating them. There are some who don't fuss over getting those calibrations perfect, but many of us do.
Bottom line: If you want quality parts printed, don't look so much at the machine they are using. Focus more on the quality of what they've already produced and by how experienced and passionate they are about producing a quality product. There are a HUGE number of variables that determine the quality of a 3D printed part. An outrageously priced machine simply can not compensate for an unskilled or uncaring operator. If you think it can - you are sadly mistaken.
Comments are closed.
