Scott Hanselman

How to set up a Raspberry Pi 3 from scratch (with video)!

March 23, 2016 Comment on this post [7] Posted in Hardware | Open Source
Sponsored By

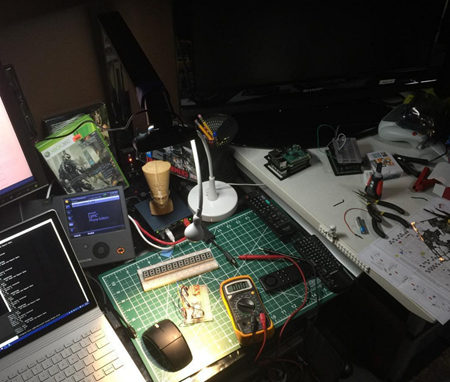
My messy electronics workspaceMarchIsForMakers continues! It's my month-long collaboration with Saron from CodeNewbie. We've had some amazing guests on our respective podcasts and some great technical content. Please do check it out at http://marchisformakers.com and subscribe to my podcast Hanselminutes as well as the CodeNewbie podcast.

Here's a few of the things we've made for you lately:

Just last week I received my Raspberry Pi 3 in the mail. I called Saron and we decided not only to do an unboxing video, but an "unboxing, setup, AND make it do something" video.

Could we setup a Raspberry Pi 3 from scratch and get it to blink an LED in less than an hour?

Every STEM house should have a Raspberry Pi or six! We've got 4? Or 5? They end up living inside robots, or taped to the garage door, or running SCUMMVM Game Emulators, or powering DIY GameBoys.

If you have a Raspberry Pi 3, awesome. If not, this should work with an original Pi or a Pi 3. You'll want to make sure you have a few parts ready to save you time and trips to the store! I recommend a complete Raspberry Pi Kit when you're just getting started as it guarantees you'll be up and running in minutes. They include the mini SD Card (acts as a hard drive), a power supply, a case, etc. All you need to provide is a USB Keyboard and Mouse. I ended up getting a cheap Mini USB wired keyboardand cheap USB wired mouse for simplicity.

I like to use the new NOOBS setup direct from Raspberry Pi: https://www.raspberrypi.org/help/noobs-setup/. You can get SD cards with NOOBS preinstalled are available from many of our distributors and independent retailers, such as Pimoroni, Adafruit and Pi Hut if you like, but I had a blank card laying around.

I downloaded SD Formatter 4.0 for either Windows or Mac and prepped/formatted my card. Then I downloaded NOOBS and unzipped it directly into the root of my now-empty SD Card.

You plug the SD card into the Raspberry Pi and pick Raspbian as your Operating System (although there are other choices this is easiest for beginners) and wait a bit. The default login is "pi" and the password is "raspberry."

In this video we not only set it up, but we also got VNC working using RealVNC for Raspberry Pi, then Blinked an LED using Python. It was a blast, and was a little touch and go for a moment near the end as we had to pull out the multimeter to debug!

I hope you enjoy it. Also, be sure to explore the #MarchIsForMakers hashtag on Twitter to see lots of other fun stuff folks are doing during our month-long celebration.

What have you made this month?


Sponsor: Thanks to Seq for sponsoring the feed this week! Need to make sense of complex or distributed apps? Structured logging helps your team cut through that complexity and resolve issues faster. Learn more about structured logging with Serilog and Seq at https://getseq.net.

About Scott

Scott Hanselman is a former professor, former Chief Architect in finance, now speaker, consultant, father, diabetic, and Microsoft employee. He is a failed stand-up comic, a cornrower, and a book author.

facebook bluesky subscribe
About   Newsletter
Hosting By
Hosted on Linux using .NET in an Azure App Service

Building Visual Studio Code on a Raspberry Pi 3

March 16, 2016 Comment on this post [30] Posted in Hardware | Open Source
Sponsored By

Visual Studio Code running on a Raspberry Pi 3 - Michonne Approves

I picked up a Raspberry Pi 3 recently for MarchIsForMakers. The Raspberry Pi 3 is a great starter computer for makers not just because it is faster than the Pi and Pi 2, but because it has Wifi built in! This makes setup and messing around a lot easier.

Here's some great tutorials for getting started with the Raspberry Pi, Node, and Visual Studio Code.

I also recommend folks setup a VNC Server for their Raspberry Pi so you can TightVNC (meaning, remote in and control) into the Pi from your PC. You can also setup your Raspberry Pi to share the clipboard so you can copy from Windows and Paste into the VNC window when you are remoted into your Pi.

But why not build Visual Studio Code and get it running natively on the Pi? Marc Gravell did it first on Twitter, but I wanted to figure out how he did it and if it was still possible (he did it before some significant refactoring) and also to see if VS Code was faster (or even usable) on a Rasberry Pi 3.

Compiling Visual Studio Code on a Raspberry Pi 3

From the VS Code GitHub, you need Node, npm, and Python. The Pi has Python but it has an old node, so needed a newer node that ran on ARM processors.

get http://node-arm.herokuapp.com/node_latest_armhf.deb
sudo dpkg -i node_latest_armhf.deb

There are some NPM native modules like node-native-keymap that didn't work when I built the first time, so you'll need some supporting libraries first:

sudo apt-get install libx11-dev

Then, from my Raspberry Pi, I did this to build my own instance of VS Code.

git clone https://github.com/microsoft/vscode
cd vscode
./scripts/npm.sh install --arch=armhf

This took the Raspberry Pi 3 about 20 minutes so be patient.

Then, run your instance with ./scripts/code.sh from that same folder.

Note: Electron and Chromium underneath it use some very specific features of X Servers like "xrandr" for dynamic resizing and you may have trouble getting Visual Studio Code to run under a remote VNC session. Consider using RealVNC or TigerVNC for your Raspberry Pi, rather than the older TightVNC. RealVNC is a commercial product but they'll give you a free license for your Raspberry Pi.

Once you've updated to a newer VNC you can run VS Code

image

Check out MarchIsForMakers all month long as we partner with CodeNewbies and play and learn with maker hardware! Last week we unboxed my Raspberry Pi 3, set it up, and got it to blink an LED!

What have YOU done with your Raspberry Pi? Sound off in the comments.


Sponsor: Big thanks to Redgate for sponsoring the feed this week! Feeling the pain of managing & deploying database changes by hand? New Redgate ReadyRoll creates numerically ordered SQL migration scripts to take your schema from one version to the next. Try it free!

About Scott

Scott Hanselman is a former professor, former Chief Architect in finance, now speaker, consultant, father, diabetic, and Microsoft employee. He is a failed stand-up comic, a cornrower, and a book author.

facebook bluesky subscribe
About   Newsletter
Hosting By
Hosted on Linux using .NET in an Azure App Service

Finding the Perfect Mouse

March 09, 2016 Comment on this post [102] Posted in Hardware | Reviews
Sponsored By

I have a small problem. I'm always looking for great computer mice. I've tried a number of mice (and keyboards!) over the years.

Five black computer mice, laid out left to right, and described in order below

Here's the current line up.

But the left one...oh this mouse. That's the Logitech MX Master Wireless Mouse and it's really top of the line and it's my current daily driver. It's usually $99 but I've seen it for $74 or less on sale.

The Logitech MX Master is a high end mouse, but rather than catering to gamers as so many mice do, it seems to be aimed more towards creators and makers. Prosumers, if you will.

Highlights

  • The MX Master has rechargeable LiPo batteries that are charged with a simple micro USB cable. So far they've lasted me two weeks or more with just a few minutes of charging. Plus, you can use the mouse with the cord attached. There's a 3 light LED on the side as well as software support so you won't be surprised by a low battery.
  • Fantastic customizable software.
    Exceptional Logitech Mosue Customization Software
  • Uses the "Unifying Receiver" which means a single dongle for multiple Logitech products. I also have the Logitech T650 Touchpad and they share the same dongle.
  • Even better, the MX Master also supports Bluetooth so you can use either. This means I can take the mouse on the road and leave the dongle.
  • Tracks on glass. My actual desktop is in entirely glass. It's a big sheet of glass and I've always had to put mouse pads on it, even with Microsoft Mice. This mouse tracks the same on a pad or a glass surface.
  • Heavy but the right kind of heavy. It's about 5 oz and it has heft that says quality but not heft that's tiring to push around.

One of the most unusual features is the Scroll Wheel. Some mice of a smooth scroll wheel with no "texture" as you scroll. Others have very clear click, click, click as you scroll. The MX Master has both. That means you can use "Ratchet" mode (heh) or "Freespin" mode, and you can assign a Mode Shift. If I click the wheel you can hear a clear mechanical click as (presumably) a magnet locks into place to provide the ratcheting sound and feel which is great for precision. Click again and you are FLYING through long PDFs or Web Pages. It's really amazing and not like any mouse I've used in this respect.

On top of that there is a SmartShift feature that automatically switches you between modes depending on the speed and vigor that you spin the wheel. All of this is configurable, to be clear.

It's a nice mouse for advanced folks or Devs because not only can you change basically every button (including a unique "gesture button" at your thumb where you click it and move the mouse for things like 'Next Virtual Desktop') but you can also have...

image

...configurations on a per-application basis!

image

This is fantastic because I want Chrome to scroll and feel one way and Visual Studio to scroll and feel another.

It's been 6 weeks with this new mouse and it's now my daily driver for code, blog posts, Office, and everything.

Trying out this new @Logitech MX Master mouse. This thing is SO SMOOTH.

A photo posted by Scott Hanselman (@shanselman) on


What's your favorite mouse or pointing device? Let's hear it in the comments!


PSA: Be sure to check out http://MarchIsForMakers.com all month long for great hardware podcasts, blogs, and videos! Spread the word and tweet with #MarchIsForMakers!

* Referral links help me buy mice. Click them for me please.

About Scott

Scott Hanselman is a former professor, former Chief Architect in finance, now speaker, consultant, father, diabetic, and Microsoft employee. He is a failed stand-up comic, a cornrower, and a book author.

facebook bluesky subscribe
About   Newsletter
Hosting By
Hosted on Linux using .NET in an Azure App Service

The Importance of the LED Moment - I DID THAT

March 02, 2016 Comment on this post [18] Posted in Hardware | Open Source
Sponsored By

Last March my friend Saron and I created MarchIsForMakers.com and spent the whole month creating and learning with hardware.

It's March again! We're going to spend the whole month of March adding to http://www.marchisformakers.com.

If you want to support our project, make sure you tell teachers, schools, family and friends about us, and tweet with the hashtag #marchisformakers.

Here's some of the highlights of this fantastic project from March of 2015. You can get ALL the content on our site, so bookmark and visit often.

Getting Started

You may have heard of Raspberry Pis and Arduinos, and perhaps considered doing a little tinkering, either with the children in your life or on your own? Where do you start?

What's "Hello World" in the world of hardware? It's making an LED light up!

I optimize my workflow for lots of tiny victories.

There's a moment when your tinkering. Getting that first program to compile or that first light to light up. Saron and I call it the LED Moment. When you are teaching a kid (a 100 year old kid or a little kid) how to successfully control an LED they'll light up..."I DID THAT." I pushed a button or ran a program or just plug it into a battery. There's a moment when a person see they can take control of the physical word, harness electricity, combine hardware and software and TURN A FREAKING LIGHT ON. That's the moment we are going for. Let's do it.

Arduino and an LED

Check out the article on CodeNewbies about Raspberry Pis and Arduinos by Julian. Arduinos are inexpensive and open source microcontrollers that are VERY affordable. I've got 4 or 5 around the house!

91goKoGWHtL._SL1500_

You'll want an Arduino UNO to start with. They are about $20 on Amazon but they don't include a USB cable (perhaps you have one) or an optional power supply. If you're planning on tinkering you might consider getting a "Super Starter Kit" or a Starter Kit WITH the Arduino that has all sorts of fun stuff like buttons and cables and fans and resistors.

For our little LED project you'll just want:

Ask around, you may have friends with these in their junk drawers so don't spend money unnecessarily.

Don't have an Arduino or can't get one? Fear not, you can simulate one in your browser for free! Check out http://123d.circuits.io/
image

Ok, if you have a physical Arduino, go download the free Arduino Software for WIndows, Mac or Linux.

Different Boards

There are a number of different flavors of Arduino boards. Lots, in fact! Since it's an open source hardware spec anyone can make one and add their own special sauce. Here is just a few of the dozens of boards.

  • Arduino Uno - Arguably the most popular introductory model. It connects via USB and looks like a standard COM port to your computer. No wi-fi, no ethernet, although you can get an "Arduino Shield" add-on board that snaps on top to extend it to do most anything.
  • Arduino Yun - A fancy Arduino with a micro-SD slot, Wi-Fi, Ethernet, and more. It even supports an OpenWRT Linux called Linino.
  • Intel's Arduino 101 Kit - This board is an Arduino from Intel that adds Bluetooth Low Energy AND a 6 axis Accelerometer.

I have an Intel board with me today, so I need to tell the Arduino Software about it by downloading an "Arduino Core." You'll want to tell the software which board YOU are using.

I go Tools | Boards | Board Manager and search for "Intel" and install it. This tells the Arduino Software what it needs to know for my board to act right.

image

Plug the board in using a USB cable and make sure that you've selected the right board and the right port in your Arduino software.

I'm going to take my LED and put the short leg - that's the negative leg - into Arduino's GND, or Ground. Then I take the long or positive leg of the LED and connect it to the resistor,  then put the resistor into the Arduino's pin 13. We are going to control that pin with software we write!

BlinenLights

We are going to pulse the LED by turning pin 13 HIGH, waiting a second, then going low. Like this, within the Arduino Software:

void setup() {
pinMode(13, OUTPUT);
}

void loop() {
digitalWrite(13, HIGH); // turn LED on (HIGH voltage)
delay(1000); // wait a second
digitalWrite(13, LOW); // turn LED off by making voltage LOW
delay(1000); // wait a second
}

Press Upload and my little Arduino Sketch is sent to my board and starts running! And here it is!

#MarchIsForMakers @intelIoT @arduinoorg #video

A video posted by Scott Hanselman (@shanselman) on

Again, every board is different. In my case, my Intel Arduino 101 board also has that gyroscope/accelerometer built in. I'll try playing with that soon!

What are you going to make this Month?

About Scott

Scott Hanselman is a former professor, former Chief Architect in finance, now speaker, consultant, father, diabetic, and Microsoft employee. He is a failed stand-up comic, a cornrower, and a book author.

facebook bluesky subscribe
About   Newsletter
Hosting By
Hosted on Linux using .NET in an Azure App Service

Benchmarking .NET code

February 25, 2016 Comment on this post [28] Posted in Open Source
Sponsored By
You've got a fast car...photo by Robert Scoble used under CC

A while back I did a post called Proper benchmarking to diagnose and solve a .NET serialization bottleneck. I also had Matt Warren on my podcast and we did an episode called Performance as a Feature.

Today Matt is working with Andrey Akinshin on an open source library called BenchmarkDotNet. It's becoming a very full-featured .NET benchmarking library being used by a number of great projects. It's even been used by Ben Adams of "Kestrel" benchmarking fame.

You basically attribute benchmarks similar to tests, for example:

[Benchmark]
public byte[] Sha256()
{
return sha256.ComputeHash(data);
}

[Benchmark]
public byte[] Md5()
{
return md5.ComputeHash(data);
}

The result is lovely output like this in a table you can even paste into a GitHub issue if you like.

Benchmark.NET makes a table of the Method, Median and StdDev

Basically it's doing the boring bits of benchmarking that you (and I) will likely do wrong anyway. There are a ton of samples for Frameworks and CLR internals that you can explore.

Finally it includes a ton of features that make writing benchmarks easier, including csv/markdown/text output, parametrized benchmarks and diagnostics. Plus it can now tell you how much memory each benchmark allocates, see Matt's recent blog post for more info on this (implemented using ETW events, like PerfView).

There's some amazing benchmarking going on in the community. ASP.NET Core recently hit 1.15 MILLION requests per second.

That's pushing over 12.6 Gbps a second. Folks are seeing nice performance improvements with ASP.NET Core (formerly ASP.NET RC1) even just with upgrades.

It's going to be a great year! Be sure to explore the ASP.NET Benchmarks on GitHub https://github.com/aspnet/benchmarks as we move our way up the TechEmpower Benchmarks!

What are YOU using to benchmark your code?


Sponsor: Thanks to my friends at Redgate for sponsoring the blog this week! Have you got SQL fingers?Try SQL Prompt and you’ll be able to write, refactor, and reformat SQL effortlessly in SSMS and Visual Studio. Find out more with a free trial!

About Scott

Scott Hanselman is a former professor, former Chief Architect in finance, now speaker, consultant, father, diabetic, and Microsoft employee. He is a failed stand-up comic, a cornrower, and a book author.

facebook bluesky subscribe
About   Newsletter
Hosting By
Hosted on Linux using .NET in an Azure App Service

Disclaimer: The opinions expressed herein are my own personal opinions and do not represent my employer's view in any way.