It takes a little while to turn a large ship. I love the .NET community and I'm happy to have been a part of it from the beginning. I'm also happy that I'm helping (in a small way) turn the ship from the engine room along with a lot of like-minded individuals.
Sometimes what seems like a "can't you just" request requires days and weeks of legal this-and-that and meetings and "alignment" (that's a thing business people LOVE to say). But if you're patient and keep pushing, change happens.
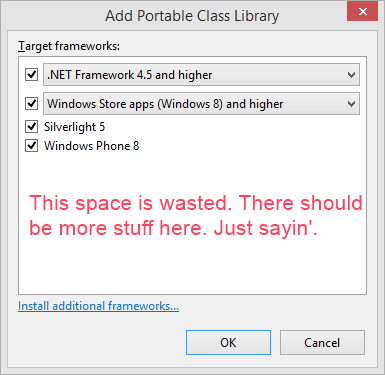
Today on 2013 with Xamarin installed, I see this after File | New Project.
Of course, there's still wasted space, but I hope you can see the change. ;) The more interesting, perhaps, change is the legal licensing changes to make sure you're allowed to use useful Portable Libraries on other platforms, like Xamarin.
In my original post there were negative (and these discussions continued on Twitter and UserVoice) comments like:
Hi Scott, unfortunately that wasted space you refer to can't be used until MS changes the licensing on many of their Nuget components (e.g. HttpClient) as these stipulate that they have to be used on Windows systems... making them far from portable! Are you aware of this, and do you know whether this situation will change in the near future?
Scott Hanselman is a former professor, former Chief Architect in finance, now speaker, consultant, father, diabetic, and Microsoft employee. He is a failed stand-up comic, a cornrower, and a book author.
So you've decide to use Font Awesome for some great scalable icons. You download them, maybe you use the Bootstrap CDN.
You're not an idiot, but you only get black squares.
You look at the F12 Developer Tools and you can see the fonts are getting downloaded.
You're super advanced, so you check that mime/types are correct on your web server and confirm them in the HTTP headers.
You've burned a half hour just pressing CTRL-F5 and clearing browser caches.
You're about to smack someone.
You're trying different browsers, checking the wire, reading the docs, googling with bing for crying out loud.
Sigh.
Then you realize that you need to have class="fa" as well as whatever the icon's class is.
So, not just
<i class="fa-pencil" title="Edit"></i>
But in fact, you need
<i class="fa fa-pencil" title="Edit"></i>
Then...it works.
I hereby declare this the Foux du Fa Fa rule of Font Awesome and blog it so I don't forget.
Sponsor: Big thanks to Telerik Icenium for sponsoring the feed this week! Build and publish iOS & Android apps with Visual Studio using only HTML5 & JavaScript! Telerik Icenium now includes Visual Studio integration. Start a 30 day trial with support now!
About Scott
Scott Hanselman is a former professor, former Chief Architect in finance, now speaker, consultant, father, diabetic, and Microsoft employee. He is a failed stand-up comic, a cornrower, and a book author.
There's been a lot of talk about power and energy usage by PCs lately, especially ones on battery. I use an irresponsibly power hungry desktop at home, an Ivy Bridge Intel Lenovo X1 Carbon Touch for work, a Surface 2 (for email, remote desktop (RDP), videos, games and airplane stuff since I don't sweat its batter) and I'm also testing this prototype Haswell that Intel sent me. Whatever machine I get next to replace the X1 Carbon Touch (likely a Yoga 2 Pro) will be a Haswell, and ideally it will support "Connected Standby." Connected Standby is a low-power state that lasts for tens (or hundreds) of hours, but allows the PC to play music, refresh email, and receive VOIP calls. Haswell is amazing, to be clear, but it's all the components working together - chipset, wifi adapter, processor - that make for a truly compelling machine.
Recently I re-discovered the powercfg.exe command line tool that's built into Windows. You have this now. It's a funny little tool that, on the one hand, lets you make minute tweaks to how power is used on your computer, but on the other hand, creates the most elaborate reports on how your PC uses power.
You may have used powercfg.exe in low disk space situations to disable the hibernation file with
powercfg /hibernate off
It'll tell you lots of things about your system that you may not know, or that may help you better use power. For example powercfg /availablesleepstates will tell you the flavors of sleep and standy your PC supports.
How deep can your PC sleep?
Here's my fat desktop:
C:\>powercfg /a
The following sleep states are available on this system:
    Standby (S3)
    Hibernate
    Fast Startup

The following sleep states are not available on this system:
    Standby (S1)
        The system firmware does not support this standby state.

    Standby (S2)
        The system firmware does not support this standby state.
This is useful to know. My desktop supports standby. Do I use it? We'll see a little later. Here's the same query on my 5 years-newer Surface:
C:\>powercfg /a
The following sleep states are available on this system:
    Standby (Connected)
These S1,S2,S3,S4 numbers indicate how "deeply" your system can sleep. S1 is dozing, and S4 is hibernation. You might find that your machine supports a mode like S3 or something but then it's a device you've added that is preventing it from sleeping that deeply. You can diagnose sleep issues (which, for me, usually end up being cheap USB things I've added) with
powercfg /devicequery s1_supported
...for each state and compare the lists of devices.
The most powerful (today) sleep state for energy management is Connected Standby also known as ACPI S0. Regular Sleep/Standby on average Win7 and Win8 machines is S3.
Connected Standby lets you effectively turn your machine off, but still get email, VOIP calls, play music, etc. There's also rules and guidelines around connected standby that limit battery drain to less than 5% of capacity over a work day.
I ran powercfg.exe /a on the prototype Haswell I've been evaluating and it too supports connected standby, which is deeply cool. This explains the fantastic standby ("in the backpack") times I see with it. As more and more machines have Haswell and support Connected Standby, developers will need to support theses "always fresh" scenarios. It's just habit for me to open a laptop before getting on a plane, launch email, load up on RSS feeds, get my flight details. It'll be very cool to have a Haswell machine in "Connected Standby" that is always fresh, even though it may have been asleep all weekend.
The real magic switches buried in PowerCfg.exe are /energy and /batteryreport and, if your machine supports "Connected Standby" also /sleepstudy, and I recommend you run them now. I shall wait. ;)
I ran the Energy Report on my Desktop and it generated a nice HTML report. Here's some highlights (it's super long).
First, my desktop isn't configured to ever fall asleep! A fail on my part.
Power Policy:Power Plan Personality is High Performance (Plugged In)
The current power plan personality is High Performance when the system is plugged in.
Power Policy:Sleep timeout is disabled (Plugged In)
The computer is not configured to automatically sleep after a period of inactivity.
Second, my wifi adapter isn't set to use Low-Power. Didn't know that.
Power Policy:802.11 Radio Power Policy is Maximum Performance (Plugged In)
The current power policy for 802.11-compatible wireless network adapters is not configured to use low-power modes.
Finally, my Wacom Tablet may have the wrong drivers or not be able to sleep:
USB Suspend:USB Device not Entering Selective Suspend
This device did not enter the USB Selective Suspend state. Processor power management may be prevented when this USB device is not in the Selective Suspend state. Note that this issue will not prevent the system from sleeping.
Device Name - Wacom Tablet
Device ID - USB\VID_056A&PID_00D1
This was extremely useful information for me, so I'll take 5 minutes and make sure this big desktop goes into standby when I'm not around.
Battery and Power Reporting on a Laptop/Tablet
If you run powercfg /batteryreport on a laptop you get a WEALTH of information in an HTML report. Here's some highlights.
Details on Installed Batteries
Lots of details on the batteries in your machine
NAME - X864048BA
MANUFACTURER - ATL
SERIAL NUMBER - 12412
CHEMISTRY - L/ION
DESIGN CAPACITY - 31,297 mWh
FULL CHARGE CAPACITY - 31,646 mWh
CYCLE COUNT - 34
What the device was doing, when, the battery mWh and times:
You get awesome charts showing how you battery discharges, charges, and percentages.
As well as detailed usage history, percentage used and hours used.
Connected Standby machines get an even MORE amazing report with /sleepstudy
You can see what apps are using what about of battery and time, what devices are the "worst offenders" and then you can use this knowledge to decide what you keep running in the background.'
Here is one Connected Standby session:
I was a little surprised at the quantity of hard data collected and stored by Windows. Also, when blogs and reviewers do detailed tests on different machines showing battery life and stressed tests, are they running powercfg.exe to ensure all the drivers are working together and haven't been flagged as either power-hungry or energy-stupid?
I would love to see even more data on what Windows is doing around energy, and I'm nearly positive the system is keeping track of power-hungry apps. Why not give me a little "heat map" in the title bar so I can know what browser uses the most power, what app is working too hard, or what website is running JavaScript in a loop? Why not give us the option to put those tools front and center?
Sponsor: Big thanks to Telerik Icenium for sponsoring the feed this week! Build and publish iOS & Android apps with Visual Studio using only HTML5 & JavaScript! Telerik Icenium now includes Visual Studio integration. Start a 30 day trial with support now!
About Scott
Scott Hanselman is a former professor, former Chief Architect in finance, now speaker, consultant, father, diabetic, and Microsoft employee. He is a failed stand-up comic, a cornrower, and a book author.
I was setting up Windows 8.1 on a machine and didn't want to use a Microsoft ID (Live ID) to sign into it. I didn't feel like linking this temporary machine to my existing Microsoft ID and just wanted a regular local login. Now, I realize that not using a Live ID would limit the things I could do and cause a lot more account popups when I visited apps like Music, Store, Video, and others, but still, I want the choice.
It wasn't immediately obvious to me how to create a local login, so I wrote it up here to help you, Oh Internet Person.
Step 1
When you get to settings, it doesn't matter if you click Use Express Settings or Customize. Pick what makes you happy.
Step 2
Setup will ask you to Sign into your Microsoft account. You can, but you don't have to. You can also click "Create a new account" at the bottom. You can click there to create a new online Microsoft account, sure, but this is also how you create a local account.
Step 3
At this point, it looks like you'll need to Create a Microsoft account, but you can also click "Sign in without a Microsoft account."
You should really know what you're doing here. Don't just do this because you don't like the idea of a Microsoft account. Be aware of the ramifications. That said, you can always add an account later. I found using a local local to be better for me when making a Virtual Machine.
Step 4
Here's where you actually make your local account. Put in a user name and password like you always do. This is a local account that has no ties to the online world.
Hope this helps someone.
Sponsor: Big thanks to Telerik Icenium for sponsoring the feed this week! Build and publish iOS & Android apps with Visual Studio using only HTML5 & JavaScript! Telerik Icenium now includes Visual Studio integration. Start a 30 day trial with support now!
About Scott
Scott Hanselman is a former professor, former Chief Architect in finance, now speaker, consultant, father, diabetic, and Microsoft employee. He is a failed stand-up comic, a cornrower, and a book author.
I'm using just a Surface 2 today for work. Remember that the Surface 2 runs Office plus any apps in the Microsoft Store. It doesn't support installing desktop apps like Visual Studio or QuickBooks. It comes with Outlook, PowerPoint, Word, Excel, etc.
I didn't plan on this experiment this morning. In fact, I was supposed to go on a field trip with my son but the bus was full. Because I was going to be out all day I didn't bring my laptop. I had only my Surface 2 in the car, so when I wasn't able to go on the field trip, it was either go home and get a "real" computer or see what I could get done on the Surface.
NOTE: If I had my iPad and a Bluetooth keyboard and a stand, plus a remote desktop client for iOS I could do something similar.
I use it for Hulu, Netflix, Halo, email, Twitter, Facebook, Trello, Calendaring, etc and for that it's great. Split screen is cool, as I did email while watching a show on the plane yesterday. (What I really want is a full Surface 2 Pro but with the same exact size and weight of the Surface 2 proper.)
Anyway, I went to a bagel shop and figured I'd be limited to email today. I had my heart set on working on an project today (hacking on Project Kudu in Azure) and that was nagging at me. I also forgot my power adapter so I had only the battery life that I started with in order to get a day's work done.
REMINDER: There are lots of Linux Virtual Machines (hundreds, in fact, if you include the VMDepot gallery of images) as well as a number of good SSH clients in the Windows Store that work on Surface. I use the "Remote Terminal" app. Here is a screenshot of me running htop on my Ubuntu machine where my mailing system runs in Azure. It's usually full screen, but I have the menus open here.
Here's some of the VMs to pick from. Soon the MSDN ones will move into an MSDN section on the left.
e
You can pick a VM from a small shared-core with less than a gig to a crazy 8 core 56 gig machine. I picked a "Medium" because it seemed similar to my laptop. It's got 2 dedicated cores and 3.5 gigs of RAM. There's also a 4 core 7 gig one, but since I'm not going to run Outlook or anything BUT Visual Studio (and some other small tools) I figured it would save money if I went a little small.
I named it "VSinTheSky" and noted that both PowerShell and RDP (Remote Desktop Protocol) ports were open in the firewall. I also put the new VM in a datacenter near me, so in the Western US region.
NOTE: Virtual Machines are billed when they are running, and you only pay for storage when they are shut down. Make sure to shut them down if you're not using them.
My friend Javier uses a Large VM for 10 hours a day and says it costs him about $3.60. I am cheap, so I'm using a Medium, so at 18 cents an hour, that will be $1.80 for the day if I work for 10 hours.
Remoting into Azure from a Surface 2 (RT/ARM)
There's a full-screen Remote Desktop client in the Windows Store that works nicely, but I like the sense of control I get from the "MSTSC.exe" desktop client, plus I can resize it a little more. You can run this on a Surface 2/RT with WindowsKey+R, then "mstsc" and enter. You can also save RDP files, as I have, on the desktop of my Surface 2. You can see in the screenshot at the top that there's a "Connect" button that lets you launch your Remote Desktop session directly from within the browser. It'll download and open the RDP there as well.
Optimizing the Azure VM for Performance
Azure Virtual Machines are allocated, I'm told, 500 IOPs (IO operations) per second, per disk. However, a great (and important) optimization is to add a data disk (or several) which gives you 500 more IOPS since each disk gets its own.
In the Azure Portal, click Attach Empty Disk.
TIP: To save time, if you have a lot of files, a large data disk, or a large project, make a VHD locally on your machine, mount it as a disk (you DID know that was built into Windows since Windows 7, right?) and get it ready. Then upload it to a Storage Blob in Azure and attach it to your VM.
When asked how big you want the disk, pick a large size. Some size you wouldn't think you'd need. Why? Turns out that Azure VHDs are "sparse." You are only billed for actual usage. If you make a 1TB disk but it only has 5 gigs used up, you're only charged for 5 gigs. I made my data disk 64 gigs since I'm just putting code on it for building in Visual Studio.
Remote into your Azure VM now, log in, and hit WindowsKey+X. Click Disk Management and partition and format your new drive. It may end up being your F drive as C is the system and D is for temp space. That temp disk is where the Windows swapfile goes,etc. That disk may go away so don't put anything on Temporary Storage.
I also moved my %TEMP% environment variable to D:\TEMP. I haven't measured if this was useful, but it feels more correct.
Here's "My PC" on the remote machine now:
It came with Visual Studio installed, I also pinned IE to the Taskbar, installed Github for Windows, Chrome, and VS Web Essentials, as well as Windows Live Writer that I'm typing in right now.
Speed, both Local and Remote
The Surface 2 is just SO much faster than the original. At least twice as fast, to me. It has a 1920x1080 screen plus I was remoted into a VM running also at 1920x1080 and I often forgot which was the host and which was local. There's really no lag when connecting to this machine in Azure. Perhaps it's because I'm using the Windows 8.x Remote Desktop client to connect to a Windows 2012R2 Server? I don't know. It's fast and clear, and I'm doing this from a café. SpeedTest.net says this café has 16Mbs down measured running on the Surface. I get 7Mbs on my LTE device it was also fast, so this tells me that if the VM is near you (the one I made in Azure is just one state over from where I live) then you should see similar speeds.
I thought perhaps the Azure VM had slow internet. Um. No.
Not Just a Dumb Terminal
I didn't use the Surface 2 exclusively as a dumb-ish terminal. Since it has IE11 and Outlook, I also did email while builds happened in the Remote Session. In this screenshot I'm setting up the remote machine, and installing Chrome after installing GitHub for Windows. I've got Outlook running there, The Verge, plus Twitter docked to the right. The remote session is the window in the middle. It was also cool to run Music in the background tethered over bluetooth to my new headphones.
Important Productivity Tips for using Remote Desktop on a Surface 2 (RT/ARM)
There's a number of small but extremely useful things to remember when using RDP on a Surface.
You aren't limited to the Remote Desktop app that’s in the Microsoft Store.
Run mstsc.exe and you’ll get the full desktop version of the Remote Desktop Client.
This means you can use .RDP files and keep them on your desktop.
You can copy/paste files (like I have with the images in this blog post) between your remote session and your host session. For example, I took screenshots from "outside" and pasted them to the desktop of my remote session.
The Surface Type Cover has a row of Function keys that are also Charms keys. Invert their function to speed up your hotkey usage.
However, if you want to do something like ALT-F4, you're expected to FN+ALT+F4 which is unacceptable to a keyboard focused developer like myself. You can toggle (invert) FN usage with FN+CAPS on a Type Cover.
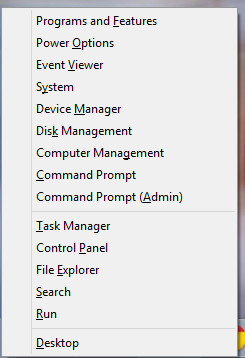
Win+X is something you'll use a lot in both the Remote and Local sessions. You can run command prompts, check device manager, setup disks in disk management, launch apps, and much more. Use it.
Find a balance between your touchscreen and keyboard. If you haven’t brought an actual mouse, accept that you'll never be fast on the Surface Touchpad. It’s just too small and too felt-y. It's there for emergencies.
Move quickly between touching the screen and your keyboard. Most times – even over a remote desktop session – using touch to drag a file or click an icon will be faster than the touchpad. Touch isn’t a replacement for input, it's an augmentation for what you’re already using.
I have found that touch is the fastest way to get the text insert cursor (I-bar) pretty close to where I want it when editing text. I touch, then move one or two to the left or right. I've found this is WAY faster than using the mouse and WAY faster than cursor-ing around with the keyboard.
While I made it through the day without a mouse, I think having an Arc Mouse or some small bluetooth mouse would have made things nicer. That said, it wasn't a huge deal as I'm mostly a keyboard + touch person. YMMV.
All in all, I'm impressed. I'm going to keep this VM around. This isn't a setup I will use every day as I have an X1 Carbon Touch, but it's comforting to know that I can go 7+ hours with a Surface in a café if it comes to that.
About Scott
Scott Hanselman is a former professor, former Chief Architect in finance, now speaker, consultant, father, diabetic, and Microsoft employee. He is a failed stand-up comic, a cornrower, and a book author.


 Important Productivity Tips for using Remote Desktop on a Surface 2 (RT/ARM)