Scott Hanselman

Offline installer for Windows Live Essentials - WLSetup-All.exe

November 01, 2009 Comment on this post [20] Posted in Tools
Sponsored By

UPDATE 2015: Here is the offline link for Windows Live Essentials 2012.

Windows Live EssentialsMy brother and his wife came over today and the kids went trick or treating. His wife mentioned she wanted to make a quick DVD of the pictures and movies we took, so I suggested Movie Maker. However, they only have dial-up and wanted an offline installer I could just put on a USB Stick (I actually figured I'd put it on their camera's SD Card.)

I went to http://download.live.com and searched all over, looking for an offline installer. I Googled with Bing, and then Googled with Google for things like "Windows Live Offline Installer" and found nothing but confusion.

Then I figured out this bizarre bit of UI on the Live Essentials download page. Rather than offering a small link for "offline installer" or a choice, you have to click Download which will attempt to start a Download of Windows Live Essentials online bootstrapper. It will then go and download just the programs you want.

However, if you cancel the download immediately, there's a "Try Again" button and some text that no one (including me) reads:

"Trying again downloads a standalone installer to your computer. This takes a little while, but may work better, depending on your connection settings."

Um, OK. I wouldn't label that Try Again, but OK.

Long story short, here's direct downloads for the Windows Live Essentials English Language ONLINE and OFFLINE installers. They are current as of the writing of this blog post. I'm not sure if they are version-specific downloads but I will try to keep them up to date.

Or, if you want an offline installer in other languages, go to http://download.live.com, click Download, cancel it, then click Try Again. I think it's weird, but there you go.


Enjoy.

About Scott

Scott Hanselman is a former professor, former Chief Architect in finance, now speaker, consultant, father, diabetic, and Microsoft employee. He is a failed stand-up comic, a cornrower, and a book author.

facebook bluesky subscribe
About   Newsletter
Hosting By
Hosted on Linux using .NET in an Azure App Service

Using a Bluetooth Jawbone Headset for BT-Audio (Microphone or Speakers) on Windows 7

October 31, 2009 Comment on this post [9] Posted in Reviews | Tools | Win7
Sponsored By

I installed a PILE of new drivers tonight from Lenovo using their most awesome System Update 4.0. Included was a Bluetooth Stack update.

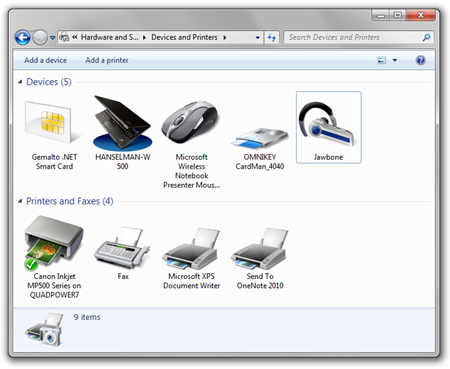
On a whim, I tried to pair my Jawbone Bluetooth Headset, something that has never worked before, and it worked!

Devices and Printers in Windows 7 showing my Jawbone

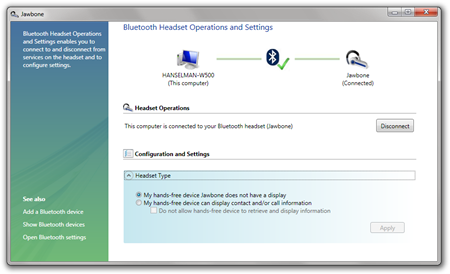
More interestingly, when I right click on the Jawbone and click "Control" I get this dialog I've never seen before!

Jawbone Bluetooth Dialog

This actually looks and feels a tiny bit unpolished. Note the tight vertical whitespace at the VERY top and the strange blue gradient, as well as the Vista-esque color scheme on the far left. Not sure if this was in Vista and just not updated for Windows 7, but it looks weird.

UPDATE: Confirmed - This crazy wrong looking dialog is owned by Lenovo, not Windows.

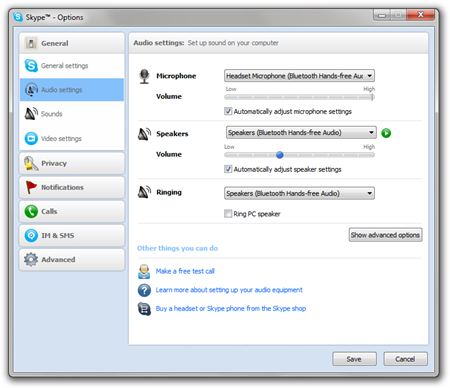
Still, then Skype popped up suddenly and said there was new audio devices available!

Skype - Options Dialog

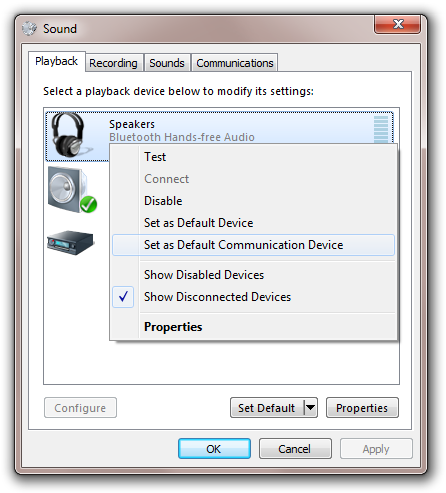
Sure enough, I've got a new Microphone and new "Speakers" in the form of my Jawbone headset. I can even use this headset for Voice Recognition, or even as my Default Communications device for Phone Calls with Office Communicator. Or, I can listen to music through my Jawbone. Deeply cool.

Sound Control Panel

I'm not sure who to thank, Windows 7 for better audio and Bluetooth support, or Lenovo for a Bluetooth 2.1 driver. Either way, I'm thrilled that my laptop can suddenly do something with Windows 7 that it couldn't do yesterday!

About Scott

Scott Hanselman is a former professor, former Chief Architect in finance, now speaker, consultant, father, diabetic, and Microsoft employee. He is a failed stand-up comic, a cornrower, and a book author.

facebook bluesky subscribe
About   Newsletter
Hosting By
Hosted on Linux using .NET in an Azure App Service

Windows 7 with BitLocker and Still Booting To VHD

October 31, 2009 Comment on this post [11] Posted in
Sponsored By

Lenovo Second Spindle Drive BayAs a remote worker at Microsoft I have to deal with a few little things that the average worker in Redmond doesn't.

For example, none of my machines are wired to "CorpNet." They're all remote so for the last two years I've had to RAS (Remote Access Service) into the corporate network. For a while you could use your password, but then you needed to use your Smart Card (or your immortal soul, as I call it) and a complex pin. So you've got multi-factor authentication, you need your actual network password (and of could your domain\username), your physical smart card and your smart card's pin. That's a lot. Someone evil could have two of those three things and you'd still be OK.

Since two of my three machines are laptops, there's always risk that I could lose it or have it stolen. If I kept secret stuff on my laptop (I don't) that could be a problem. Laptops run Windows 7 now and are required to be BitLocker'ed (FAQ). This means the whole hard drive is encrypted, there's an (optional) PIN to even turn it on, and it can take advantage of newer machines that have a TPM (Trusted Platform Module). Basically a TPM is a hardware cryptoprocessor that can store keys for securing information. BitLocker uses this chip to project the keys and makes sure the BIOs and boot sector haven't been tampered with. Fortunately it's all automatic so I don't have to think about it.

This is what I see when I'm booted off my Bitlocker'ed C: drive. That D: drive is my other spindle.

My drive Bitlockered

I recently Bitlocker'ed both my laptops, but I Boot to VHD for many demos and it's not possible to boot off a VHD that lives on a Bitlocker'ed volume. That's the one bad thing about Bitlocker from my point of view. I'm sure it's a chicken and the egg problem. How do you boot off a file on an encrypted volume without booting off the encrypted volume?

Turns out though that you can still Boot to VHD in a few other ways. You can partition your drive with a Bitlocker'ed C: and an unencrypted D:, or you can get a second spindle. That means, you can get another hard drive and put it in the slot when your DVD/CD usually goes. That's what I decided to do.

I bitlockered my 256 gig OCZ Vertex SSD, and I have a D: drive that is my 160 gig random no-name SATA drive. On that drive I only put demo VHDs.

I had to go into the BIOS of my Lenovo W500 and add the drive to the "boot order" in order to make it spin up on boot and be available to Windows. Then, since I can't really be sure of it's drive letter that early, I changed the syntax of my BCDEdit settings a bit. Figured I'd let Windows figure it out, so instead of [D:] I used [LOCATE]. Like this:

C:\>bcdedit /copy {current} /d "My New VHD Option"
C:\>bcdedit /set {guid} device vhd=[LOCATE]\<directory>\<vhd filename>
C:\>bcdedit /set {guid} osdevice vhd=[LOCATE]\<directory>\<vhd filename>
C:\>bcdedit /set {guid} detecthal on

Now, when I'm booted into my VHD, I see this:

 Booted to VHD with a Bitlocker'ed original C:

What are we seeing?

  • My D: drive is my original boot SSD. It's marked with a lock icon. I can't access it right now.
  • My C: drive is the whatever.vhd that I booted off of. I made it 40gigs, so it is. (The actual file is 15gigs, but it "blows up" while I'm running on it. It'll shrink back down when I'm not booted off it.
  • My E: drive is some system partition I don't know about.
  • My F: is the Second Spindle that all my VHDs live on.

But, how can I get access to my secure C: drive when I'm booted into this insecure world? Of course, we don't want the bad guys to get in there, which makes sense.

If I double click, I see this:

Getting access to a BitLockered Drive

These options are all settable with Group Policy I think, but my choices are to add a really complex Password to get access to this drive or use my Smart Card. I can also use the recovery key that I saved in a secure location when I originally locked the drive.

I unlock it, and I see this:

Booted to VHD with an unlocked bitlocker drive

Now, just for the duration of this single boot, this disk is available to me. Very cool.

I was a little afraid when I Bitlocker'ed my machine just before a trip, but I'm feeling pretty good about it so far. I haven't noticed any perceptible slowdown but the FAQ says "single digit." I've heard numbers like 3%, but I haven't noticed it in the sense that my machine isn't suddenly "sluggish."

I'm VERY suspicious when corporate IT wants to reach out from Redmond and do something to my computer but this turned out great.

Here's the email I sent internally to my team today about Bitlocker:


As you know, MSIT is starting to put BitLocker on mobile machines. I recommend you upgrade any Vista machine to Windows 7 before running Bitlocker. As always, backup your data first.

I figured I should be the guinea pig for you guys, so I Bitlockered BOTH my Lenovo T60p and Lenovo W500 yesterday. These are my two corporate machines.

1a. On my W500 I was automatically prompted to reboot and enable the TPM (trusted platform module) in my BIOs. This enable step was automatic and only required me to press F10 once.

1b. On my T60p, I was told to enter the BIOs manually and enable it. There is no “TPM” section in the T60p. Instead, you go into Security, the Security Chip and turn on all the options under Security Reporting. Save your BIOS settings and reboot.

2. When prompted for a “PIN” I declined. This >=5 digit number would be a system-level password for when you start-up your machine. It's recommended, but ultimately up to you.

3. The process ran OVERNIGHT. It took at least 5 hours on each machine from what I can tell.

4. Next, go to the Start Menu and type “manage bitlocker.” You’ll want to save and print your recovery key. The Importance of this step cannot be overstated. Save this key and treat it like it is your immortal soul.

c. If Bitlocker smells any funny business you’ll get prompted for these keys. Murphy’s Law says this will happen 10 minutes before a major conference speech. No excuses for not having these. Without them, your computer is a brick. (That's kind of the wonderful point of BitLocker. ;) )

That scary part said, it works exactly as it should. It was easy and painless.

So far, we are not forced to lockup second drives/spindles. This means that you can STILL boot to VHD off of a second drive if that drive is NOT connected via USB (SATA, IDE, etc are still Ok). I’ve moved my BootToVHDs off into D:\ for this purpose. Regular VMs run just fine on the BitLocker'ed drive.

All in all, it works exactly as it should. I have no idea it’s there and my machine seems just as fast.

Let me know it you have any questions.


All in all, an interesting experience. I'm glad it went so well. You can even BitLocker USB drives as well with BitLocker To Go.

Related Links

About Scott

Scott Hanselman is a former professor, former Chief Architect in finance, now speaker, consultant, father, diabetic, and Microsoft employee. He is a failed stand-up comic, a cornrower, and a book author.

facebook bluesky subscribe
About   Newsletter
Hosting By
Hosted on Linux using .NET in an Azure App Service

The Weekly Source Code 46 - Jeff Key rocks Taskbar Meters that Monitor your Windows 7 CPU and Memory and Disk in the Taskbar

October 30, 2009 Comment on this post [8] Posted in Source Code | Tools | Win7 | Windows Client | WPF
Sponsored By

imageIt's funny to watch things go viral, even just a little viral on the Internet. Here's what happened, but more importantly, we'll talk about the code. Let's also make it complete clear that Jeff Key rocks. See picture at left, in between his two "lame" creations."

First, I did a post earlier this week called "Light it Up: List of Applications that use new Windows 7 Features." A day or two later I got an instant message from my former-roommate and part-time belay Jeff Key (@JeffreyKey on Twitter) (actually, that's all a complete lie, but, Jeff and I are friendly acquaintances for many years and have each other on IM) that said:

Saw your Win7 features post yesterday, so whipped this up last night and posted it on codeplex this morning:

http://taskbarmeters.codeplex.com/ kind of lame, but that's how i roll

Jeff Key jeff.key@sliver.com

For years Jeff has lived the mantra "Talk is Cheap, Show Me the Code." And he does, with some of the most inspired little .NET-based utilities out there asking for little else but our undying admiration and gratitude. That is how Jeff rolls. I visited his CodePlex site and saw it had 11 downloads.

image

I tweeted it and forgot about it. Then that tweet got picked up by Download.com (which I've heard of and whole gave credit to Jeff) Life Rocks 2.0 (which I've never heard of and who gave credit to no one) and then Lifehacker (which I have heard of and who "via'ed" Life Rocks). Next, I returned to CodePlex and saw that it had 4152 downloads! Congrats to Jeff for being so "lame!" ;)

image 

The Code

Why would Jeff be so down on himself and say the code is "lame" when clearly people were (are) going bananas and downloading these little utils? Well, because it's so darn easy to do, this was likely the source of Jeff's intense guilt. ;) The Windows API Code Pack makes it easy.

ASIDE: In fact, WPF on .NET 4 makes it even easier because it includes the new TaskbarItemInfo class that lets you do this from XAML. Pete Brown from my team has a great write-up on Showing Progress in the Windows 7 Taskbar with WPF 4 on his blog.

First, since his apps are specific to Windows 7, he checks first to make sure it's OK to continue. Note that it IS very possible to make apps that work great from XP to Windows 7, but these apps are little Windows 7 showcases, so you can see why he'd want to check for this:

if (!TaskbarManager.IsPlatformSupported)
{
MessageBox.Show("Sorry, but this app only works on Window 7.", "Aw snap!", MessageBoxButton.OK, MessageBoxImage.Error);
Application.Current.Shutdown();
}

To update the Taskbar (Superbar) Progress Bar he wrote a little helper because he wanted the colors to be green, yellow or red depending on the value of the CPU usage or Memory usage:

public void SetTaskBarStatus(int value)
{
if (value < 0)
{
value = 0;
}
else if (value > 100)
{
value = 100;
}

var state = TaskbarProgressBarState.Normal;

if (value > _settings.Yellow)
{
state = value < _settings.Red ? TaskbarProgressBarState.Paused : TaskbarProgressBarState.Error;
}

TaskbarManager.Instance.SetProgressState(state);
TaskbarManager.Instance.SetProgressValue(value, 100);
}

Then he just sets up a little System.Timer love and sets the Progress Bar values appropriately for Memory...

public partial class App : Application
{
private ComputerInfo _computerInfo;
private ulong _totalPhysicalMemory;

protected override void OnStartup(StartupEventArgs e)
{
base.OnStartup(e);

_computerInfo = new ComputerInfo();
_totalPhysicalMemory = _computerInfo.TotalPhysicalMemory;

var mainWindow = new MainWindow();
mainWindow.Tick += WhenTimerTick;
mainWindow.Show();
}

private void WhenTimerTick(object sender, EventArgs e)
{
var available = (double)(_totalPhysicalMemory-_computerInfo.AvailablePhysicalMemory) / _totalPhysicalMemory;
((MainWindow)sender).SetTaskBarStatus((int)(available * 100));
}
}

or CPU...

public partial class App : Application
{
private readonly PerformanceCounter _counter = new PerformanceCounter();

protected override void OnStartup(StartupEventArgs e)
{
base.OnStartup(e);

_counter.CategoryName = "Processor";
_counter.CounterName = "% Processor Time";
_counter.InstanceName = "_Total";

var mainWindow = new MainWindow();
mainWindow.Tick += WhenTimerTick;
mainWindow.Show();
}

private void WhenTimerTick(object sender, EventArgs e)
{
((MainWindow)sender).SetTaskBarStatus((int)_counter.NextValue());
}
}

Jeff also adds some JumpLists to launch Task Manager or Resource Monitor on right-click as well. Nice touch! A little polish there.

image

Also easy to do with the Windows 7 APIs in the Windows API Code Pack.

var jumpList = JumpList.CreateJumpList();
var systemFolder = Environment.GetFolderPath(Environment.SpecialFolder.System);

jumpList.AddUserTasks(new JumpListLink(Path.Combine(systemFolder, "taskmgr.exe"), "Open Task Manager")
{
IconReference = new IconReference(Path.Combine(systemFolder, "taskmgr.exe"), 0)
});

jumpList.AddUserTasks(new JumpListLink(Path.Combine(systemFolder, "perfmon.exe"), "Open Resource Monitor")
{
IconReference = new IconReference(Path.Combine(systemFolder, "perfmon.exe"), 0),
Arguments = "/res"
});

jumpList.Refresh();

Nice job, Jeff Key. You rock. So, Dear Reader, go light up YOUR applications under Windows 7. Enjoy!

Patching this Open Source Project and adding a Disk IO Meter

A day later, @ScottMuc tweeted me about adding a Disk IO Meter and we went back and forth about it on Twitter. He eventually submitted a patch to CodePlex. While Jeff hasn't updated his code with that patch (maybe he'll make me an admin and I can do it), I'm able to patch my local copy, of course.

Useful Link: Example: How to contribute a patch to an Open Source Project

Downloading ScottMuc's patch and simply right clicking (using Tortoise SVN) and clicking Apply Patch gives me a new TaskbarDiskIOMeter project that I can then add to the larger solution. The only problem with the patch was that it refers to a binary file called Drive.ico that didn't get included in the .patch file. I found one and added it and now we've got a Disk IO monitor as well. :)

 image

Enjoy!


1. Get Windows 7 and the SDK

2. Develop and Test Your Application

3. Get the Windows 7 Logo

4. Light Up Your Application with Windows 7

Related Links

About Scott

Scott Hanselman is a former professor, former Chief Architect in finance, now speaker, consultant, father, diabetic, and Microsoft employee. He is a failed stand-up comic, a cornrower, and a book author.

facebook bluesky subscribe
About   Newsletter
Hosting By
Hosted on Linux using .NET in an Azure App Service

Connectify creates and shares Virtual WiFi Hotspots with Windows 7

October 30, 2009 Comment on this post [9] Posted in Reviews
Sponsored By

Somewhere around 2002, Microsoft Research started trying to figure out how to virtualize a WiFi adapter so one physical adapter could act as multiple virtual adapters. This functionality is actually baked into Windows 7, so if you've got 7, you've got this.

Fast forward to today and there's a new product in Beta called "Connectify." Since I just started using a new 4G WiMAX product called Clear I thought this would be the perfect match.

First, on my Dell Mini 9, I made a connection with Clear.com's WiMAX.

Screenshot of my Dell Mini 9 connected to Clear and using Connectify

Then, I simply ran Connectify, gave it a new secret WPA passphrase, and created a new WiFi hotspot. I could have called the HotSpot anything and the passphase can be anything.

Next, over on my Lenovo T60p, I checked out the list of WiFi hotspots nearby:

Conectify in my list of WiFi hotspots

There it is. For the test, I disconnected my primary WiFi and connected only to the Connectify spot and it worked famously. I was sharing my Clear.com connection with two laptops.

I love this product and I know I'll use it all the time. The real question is going to be how they price it. I'd totally pay $19.95 for this to connect up to, say, 3 people. If they try to charge $40 for a basic service, that's going to be a hard sell in my opinion. Personally, I have no idea how much they intend to charge, I just caution them and hope they think about this.

Isn't this just Internet Connection Sharing?

This was my first question. I asked their support and suggested they add the answer to their FAQ. It's a very good answer and spot on:

The ICS (Internet Connection Sharing) feature you mention is really ICS + Ad Hoc WiFi. 

My quick response is:

1) It's a real wifi access point, not an ad hoc Wifi connection.

2) The Virtual WiFi driver feature in Windows 7 lets us set up your Wifi access point, while actually staying attached to another Wifi network at the same time.  With the old ICS/ad hoc thing, you could not use your internet connection for anything but the ad hoc sharing.  (ie, you needed to get your internet from another card).

3) I realize you're at Microsoft, but ICS has severe issues.  It loses all of your settings every time the machine reboots for example, making it effectively useless for anything but a quick demo. 

Makes total sense to me. ICS is nice if you have two network cards, but it's hardly convenient or easy.

One unrelated caveat:

Warning: You need to check with your provider if you're planning on sharing your connection. I'm planning on using it from, for example, my hotel to share with my phone, or at a coffee shop to share with maybe one additional person. Share smartly. From Connectify's site:

Am I allowed to share my Internet?

This depends on the terms of service of your Internet Service Provider. Many have terms against reselling the connections, however sharing with friends, family and your other computers is generally fine.

It works fantastically. The UI is a little goofy, particularly the form validation is unclear. Make sure your WPA password is at least 8 characters or you'll get flummoxed.

Still, Connectify is a winner and I wish them all the best!

About Scott

Scott Hanselman is a former professor, former Chief Architect in finance, now speaker, consultant, father, diabetic, and Microsoft employee. He is a failed stand-up comic, a cornrower, and a book author.

facebook bluesky subscribe
About   Newsletter
Hosting By
Hosted on Linux using .NET in an Azure App Service

Disclaimer: The opinions expressed herein are my own personal opinions and do not represent my employer's view in any way.