How to set up a tab profile in Windows Terminal to automatically SSH into a Linux box
 By now I hope you've installed Windows Terminal. If not, go do that, I'll wait. It's time.
You may also have customize your settings. If you tried terminal a few versions ago and haven't gone back in, it's also time to let the Windows Terminal generate you a nice fresh new profiles.json (settings file). It's OK to zero-out/delete yours. Windows Terminal will regenerate it when it next starts.
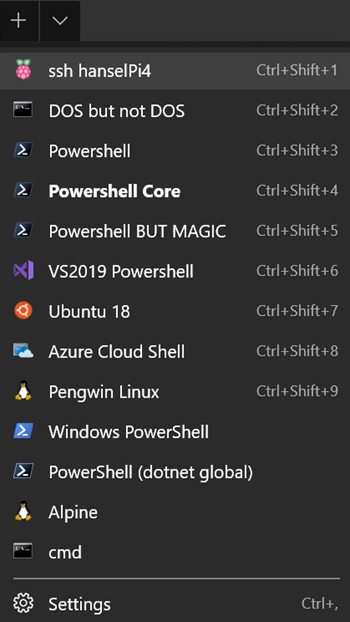
I have a number of things in my Terminal dropdown. It looks like this.
However, I'd like to be able to have a profile that ssh's into Linux machines that I use regularly. Perhaps those remote machine can have their own cool menu item? Let's see what that would look like and how we'd do it.
Adding a New Profile to Windows Terminal
Click the down arrow in the Windows Terminal top tab bar. Note that there are a ton of great and useful settings so explore the Settings Schema, and when you're editing the settings make sure that Visual Studio Code is set as your default handler for .json files. That's important because the Windows Terminal settings profile.json includes a JSON Schema and you'll want your settings to have autocomplete/intellisense. This will make it easier to create and discover new settings.
I'll add a profile to the "profiles" array. To start, and to learn, let's add the simplest possible profile! I'm just adding the { } as an array item in the larger profiles [] and giving it a name.
"profiles": [
    {
      "name":  "This is a name"
    },
This will make a new menu item in Windows Terminal with the same name. It will have no icon and it'll launch cmd.exe as the default shell because I didn't set any other command line! It I add it at the top (as the first) item in the profiles array it'll also appear first in the menu and have the hotkey Ctrl+Shift+1.
This is lame, so let's add more. I'll add a tabTitle and a commandline.
    {
      "name":  "This is a name",
      "tabTitle": "This is a tab title",
      "commandline": "powershell"
    },
This menu item will appear as "This is a name" in the menu, but the the tab will be called "This is a tab title." It'll launch powershell. Note that I didn't include .exe even though I could have. I wanted to make sure you're clear that Windows Terminal is basically just called Process.Start so you can set a profile tab to call anything in the PATH, or you can be explicit. I could also add "startingDirectory" and a bunch of other options.
Since I can call anything in the PATH, what else can I get away with?
Using OpenSSH on Windows
You may not have heard but OpenSSH has shipped in Windows for a few years now. That means that a lot of the utilities that you might have installed Putty for are already available in Windows. You can open an admin PowerShell and run one command to ensure OpenSSH's client apps are there:
Add-WindowsCapability -Online -Name OpenSSH.Client~~~~0.0.1.0
This installs the the client, but there's an optional server as well if you'd like.
I'm going to focus only on the client. Skip to the next area if you want to do your SSH'ing from Linux, not Windows.
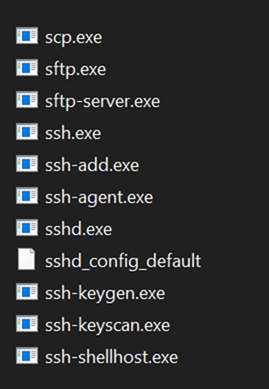
Here's what's installed in c:\windows\System32\OpenSSH

Here we've got sftp, scp, and most importantly, ssh.exe and ssh-agent. Since ssh is in the PATH when it's installed with Windows I can change my Windows Terminal profile to look like this and log into my Raspberry Pi 4.
{
  "name":  "ssh hanselPi4",
  "tabTitle": "HanselPi4",
  "commandline": "ssh pi@hanselpi4"
},
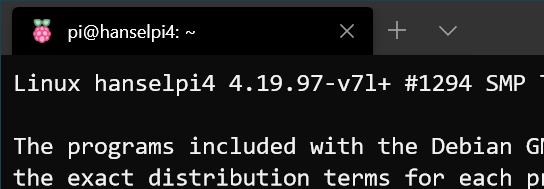
Note in this screenshot I've got the ssh connection listed at the top, and when I click on it it opens ssh.exe and prompts me for a password. I have no ssh keys on my system that would enable auto-login, hence the password is needed.

Automatically SSH'ing/logging into a Linux machine from a Windows Terminal profile
Now this is important, so pay attention. If you have WSL or WSL already on your machine you can certainly just use the SSH keys and utils that are included in your preferred Linux distro.
In that case, your command line in your Windows Terminal profile would be something like:
wsl ssh pi@hanselpi4
or if you want a specific distro, you can launch a distro and ssh from there.
wsl -d Ubuntu-18.04 ssh pi@hanselpi4
If you know Linux, then you're familiar with how to set up your public keys to allow this. However, most folks think you need Putty or some 3rd party tool to do this on Windows so I'll focus on how do to that here.
I want to be able to type "ssh pi@hanselpi4" from my Windows machine and automatically be logged in. More specifically I want to click the profile and have it Just Work.
I will
- Make a key on my Window machine. The FROM machine, in this case, Windows. Then I want to ssh FROM here TO the remote Linux machine.
- Tell the Linux machine (by transferring it over) about the public piece of my key and add it to a specific user's allowed_keys.
I'll run ssh-keygen to make a key from my command line on Windows. I just hit enter to generate it but you can make your own filename if you want, just use the full path and make sure you keep track of where things are. Defaults are usually best.
>ssh-keygen
Generating public/private rsa key pair.
Enter file in which to save the key (C:\Users\scott/.ssh/id_rsa):
Enter passphrase (empty for no passphrase):
Enter same passphrase again:
Your identification has been saved in hanselpi4.
Your public key has been saved in hanselpi4.pub.
Remember the path is c:\users\yourname because that's the Windows equivalent of the ~ home folder and the keys are in c:\users\yourname\.ssh.
Now I want to transfer what's in id_rsa.pub over to my Raspberry Pi. You can scp (secure copy) if you want, but it's best to append the key to the authorized_keys file on the destination machine.
NOTE: I'm type'ing (cat on Linux is type on Windows) that text file out and piping it into SSH where I login that remote machine with the user pi and I then cat (on the Linux side now) and append >> that text to the .ssh/authorized_keys folder. The ~ folder is implied but could be added if you like.
Run this command once on Windows to output your key and pipe it over to, and append to, the right file on your remote Linux machine. You'll be prompted for your password once.
type c:\users\scott\.ssh\id_rsa.pub | ssh pi@hanselpi4 'cat >> .ssh/authorized_keys'
Make sure you understand what's happening in the line above.
Adding a profile Icon - the raspberry on top
At this point I can click the menu item in Windows Terminal and automatically be ssh'ed/logged into the remote terminal. But, scandalously, the Terminal menu item has no icon. This is clearly unacceptable M$sft sucks, right? I'll go get a nice 32x32 Raspberry Pi Icon and put it somewhere. You might put yours in a Dropbox or OneDrive so they are available everywhere you go.
Now my profile looks like this:
"profiles": [
{
  "name": "ssh hanselPi4",
  "tabTitle": "HanselPi4",
  "commandline": "ssh pi@hanselpi4",
  "icon": "c:/users/scott/downloads/icons8-raspberry-pi-32.png"
},
How lovely is this?

Looks good, has a nice title and icon, and I can use a hotkey to automatically SSH into my remote machine.
One final note, you've already got the Azure Cloud Shell in the Windows Terminal (you can get there for free at http://shell.azure.com in your browser and access a free Linux container anywhere anytime with a persistent cloud drive) but now you can follow the instructions in this post and set up one-click SSH to anywhere.
Hope this is useful!
Sponsor: This week's sponsor is...me! This blog and my podcast has been a labor of love for over 18 years. Your sponsorship pays my hosting bills for both AND allows me to buy gadgets to review AND the occasional taco. Join me!
About Scott
Scott Hanselman is a former professor, former Chief Architect in finance, now speaker, consultant, father, diabetic, and Microsoft employee. He is a failed stand-up comic, a cornrower, and a book author.
About Newsletter
←[94mApi-service-7cd94bb969-252z6←[0m ←[34mApi-service←[0m [11:19:04 INF] Hosting environment: Docker
while the same app executed directly from git-bash displays nicely colored output?
Never been easier to ssh with the yubikey.
Comments are closed.

Just a question : Why not using ssh-copy-id rather than the complex type cat thing? Did you encounter anny issue while using it?