Scott Hanselman

Simplify your Visual Studio 2010 Toolbar and Free Your Mind

March 12, 2011 Comment on this post [34] Posted in Tools | VS2010
Sponsored By

You aren't using those toolbar buttons. Certainly not all of them. In fact, ScottGu once bet a group that they couldn't name every button from  left to right.

image

In some cases toolbars get added, then added and forgotten about. But they are there, up there in toolbar-space and they are taking up not only pixels, but also mental space.

Go ahead and take two minutes. Free your mind and clean house.

Go setup your virtual development workspace and make it fresh and personal.

Doesn't that feel better?

Here's my Visual Studio after cleaning house. It feels faster (it's not) and it looks cleaner and it imposes less psychic weight on me.

KnockoutJsonDemo - Microsoft Visual Studio (29)

Right click on your Toolbar and remove the ones you don't use. Even better, while you're in customize mode, grab just those commands that you use (maybe ones that aren't on your toolbar even though you use them) and get rid of ANYTHING you don't use every day.

Customize (27)

Now, all those docked/pinned Tool Windows? Close the ones you don't use every day. Ah, to use a Rob Conery-ism, it's like rolling up the window in you car while driving on the freeway.

Next, head over my friends at http://studiostyl.es and get a nice Visual Studio Color Scheme and then a new Wallpaper from http://vs2010wallpapers.com. Or, get creative and submit your own creation to both sites!

Enjoy and be happy.

Related Links

About Scott

Scott Hanselman is a former professor, former Chief Architect in finance, now speaker, consultant, father, diabetic, and Microsoft employee. He is a failed stand-up comic, a cornrower, and a book author.

facebook bluesky subscribe
About   Newsletter
Hosting By
Hosted on Linux using .NET in an Azure App Service

NuGet Action Plan - Upgrade to 1.1, Setup Automatic Updates, Get NuGet Package Explorer

March 09, 2011 Comment on this post [12] Posted in ASP.NET | NuGet
Sponsored By

I've got three small actions for you, Dear Reader. They will make your life better. Perhaps follow along and do them as you read?

First, go get NuGet, the .NET Package Manager. What? You already have it? Do you have NuGet 1.1 already and all setup for automatic upgrades?


Action 1: Automatically Check for Extension Updates

Go into Tools | Options, then Environment | Extension Manager and click "Automatically check for updates to installed extensions."

Visual Studio Options - Automatically check for Package Updates

Turns out that when you have a Visual Studio extension installed, like NuGet, it's not really clear when there are updates available. Many, if not all of your extensions may be out of date. For example, NuGet 1.0 comes with ASP.NET MVC but you probably didn't notice there was an update available. 

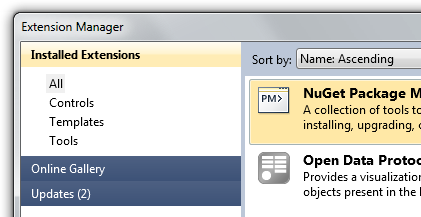
Why wouldn't you notice? Because the Updated notification is SO OBVIOUS. </sarcasm>. Can you find it in the screenshot below? Exactly.

Extension Manager with obscure and hard to find Updates button

Things are better with automatic notification turned on. Even more, if you want a cool tray/toast/balloon notification, you can install the Visual Studio Productivity Power Tools.

New extension updates are available

You'll get a nice notification when new stuff is available, like this balloon.


Action 2: Upgrading to NuGet 1.1

If you want to upgrade manually, go to Tools | Extension Manager, click Updates on the left side to see this dialog. Note your current version and the new version and click Update.

NuGet Package Manager in the Extension Manager

And that's it. You are up to date and you'll be notified of updates in the future.

VISUAL STUDIO SP1 GOTCHA: If you're running Visual Studio SP1, you'll need to uninstall NuGet 1.0, then install 1.1 from NuGet.org because SP1 has better support for signed packages and 1.1 is correctly code signed. You'll need to run as Administrator to uninstall NuGet 1.0. Hold down Ctrl-Shift while you click on Visual Studio, or right click and Run As Administrator. You'll know you are (or are not) Administrator for that one instance because [Administrator] will appear in the Title Bar if you are. If you're not, the Uninstall button in Tools | Extension Manager will be grayed out. The whole operation will take <2 minutes.

NuGet with the uninstall button grayed out


Action 3: Get NuGet Package Explorer

Luan, one of the NuGet devs, created this cool NuGet Package Explorer that you can install in seconds via Click Once. It's a little farther down on the releases page at http://nuget.codeplex.com/releases. By the way, there's also a command-line NuGet.exe there to play with.

The NuGet Package Explorer is cool for a number of reasons. Five, in fact.

First, cool high res-icons for *.nupkg files. I respect a fellow who has the attention to detail to register an extension and make super high-res icons. I'm always disappointed when I see the small icons and then make the huge and I'm like "Damn, crappy icon FAIL." Not here. Big thanks to Lenny Bacon for making the icons and giving them to the community!

A lot of NuPkg files with pretty icons

Second, you see all the details, metadata and contents of the file.

NuGet Package Explorer - EFCodeFirst.SqlServerCompact.0.8.8482.1

Third, Packages can be opened directly from the Feed and you can explore their inner workings without missing about with unzipping and what not.

Fourth, you can create new packages and build them within the tool:

image

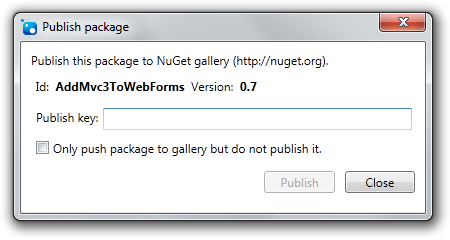
Fifth, you can publish directly from the NuGet Package Explorer as well.

Publish package

Now you've got the choice to do all your NuSpec package creation totally from the command line or totally graphically. I think it'd be nice if it was installed automatically.


Requirements

Install NuGet here. NuGet requires that PowerShell 2.0 be installed. Powershell 2.0 is already installed if you have one of the following operating systems installed:

  • Windows 7
  • Windows Server 2008 R2

If you have the following operating systems, you will need to manually install Powershell 2.0.

  • Windows XP SP3
  • Windows Server 2003 SP2
  • Windows Vista SP1
  • Windows Server 2008

If you have any problems installing NuGet, please refer to our list of known issues.

Related Links

About Scott

Scott Hanselman is a former professor, former Chief Architect in finance, now speaker, consultant, father, diabetic, and Microsoft employee. He is a failed stand-up comic, a cornrower, and a book author.

facebook bluesky subscribe
About   Newsletter
Hosting By
Hosted on Linux using .NET in an Azure App Service

NuGet Package of the Week #1 - ASP.NET Sprite and Image Optimization

March 07, 2011 Comment on this post [22] Posted in ASP.NET | ASP.NET MVC | NuGet | NuGetPOW
Sponsored By

I was thinking since the NuGet .NET package management site is starting to fill up that I should start looking for gems (no pun intended) in there. You know, really useful stuff that folks might otherwise not find. I'll look for mostly open source projects, ones I think are really useful. I'll look at how they built their NuGet packages, if there's anything interesting about the way the designed the out of the box experience (and anything they could do to make it better) as well as what the package itself does.

Sprite and Image Optimization Preview 3

First, I noticed that the ASP.NET Sprite and Image Optimization preview has been updated to Preview 3. These is an example of something that Microsoft might ship with a future version of ASP.NET, but that you can use today. It's even easier because it's in NuGet.

Install-Package AspNetSprites-MvcAndRazorHelper

They've structured this nicely. There are three packages, in fact, with the "leaf" packages depending on the Core.

image This is an API for ASP.NET to automatically generating CSS sprites and inline images. It works in ASP.NET WebForms, MVC as well as Web Pages. Nice example if you're writing a library of your own and you want it to work for all three ASP.NET techniques (remember it's all ASP.NET). All the source is up there.

The idea behind sprites is that if you've got a page with dozens or even hundreds of small images, perhaps icons on the page, you'll be paying for all those HTTP requests. Instead, why not retrieve a single image with the little ones oriented in a grid, then let the browser break them up at runtime with CSS as "sprites." However, the actual creation of those original grid-like images are often a hassle.

Not only do you have to make the original images, you'll also need to create a CSS file with the relative positions of the image you want in the source image.

You can also do "inline" images in some new browsers by base-64 encoding small images and putting them inside the img tag on the page itself.

Example of an inline image 

ASP.NET Sprites in WebForms

They include a helpful readme.txt (this is a best practice) in the App_Sprites folder that is created when you install the package. Here's the readme. It's nice because it really tells you everything you need to know AND includes pointers to docs. You'd be surprised how few packages do even this. Remember that your NuGet user is likely either IN Visual Studio or NEAR Visual Studio, and since NuGet exists to prevent us from hunting for stuff, don't make your user hunt for things.

For detailed information on ASP.NET Sprites and the Image Optimization Framework, go to http://aspnet.codeplex.com/releases/view/61896

QUICK START:

1) Add your images to the "App_Sprites" directory.
2) Depending on your application type:

****************************
*** ASP.NET Web Forms 4 ****
****************************


**********************************
*** ASP.NET MVC 3 (ASPX Views) ***
**********************************

<%: Sprite.ImportStylesheet("~/App_Sprites/") %>
<%: Sprite.Image("~/App_Sprites/YOUR_IMAGE.jpg") %>

********************************************************
*** ASP.NET MVC 3 (Razor Views) or ASP.NET Web Pages ***
********************************************************

@Sprite.ImportStylesheet("~/App_Sprites/")
@Sprite.Image("~/App_Sprites/YOUR_IMAGE.jpg")

I fire up Visual Studio and make a new ASP.NET WebForms project. Remember I can use NuGet from the command line, from within VS with a dialog, or from within VS using PowerShell.

I right-click on the References folder in the Solution Explorer, and search for "Sprite" online. I'll install the AspNetSprites-WebFormsControl.

Add Library Package Reference (19) 

Now, I just add some images to the App_Sprites folder. Here's my images in Explorer:

App_Sprites

Next, I just run the application once. Look at the same folder now. Note the sprite0.png? (Of course there are settings you can override.) See how the new sprite file is a merge of all the little images?

App_Sprites (21)

There's also new .CSS files as well with new CSS classes to access each one. Very cool.

.camera-png
{
width:48px;
height:48px;
background-image:url(sprite0.png);
background-position:-0px -0px;
}

However, with WebForms I never have to worry about this stuff. Remember that WebForms is about controls. I can add this control and WebForms will handle the IMG tag and the CSS tag.

ImageUrl="~/App_Sprites/video.png" />

And the image is output like this for maximum compatibility.

Pretty cool.

ASP.NET Sprites in ASP.NET MVC (as a Razor Helper)

Now, if I do the same thing, except install-package AspNetSprites-MvcAndRazorHelper in an ASP.NET MVC project.

For an ASP.NET MVC project, I add the CSS manually in the of my _Layout.cshtml:

@Sprite.ImportStylesheet("~/App_Sprites/")

And then I use the Sprite helper wherever I want see an image:

@Sprite.Image("~/App_Sprites/video.png")

Works exactly the same as the WebForms one, except the usage feels more like MVC. Again, this package is a nice example of how one library can be made available for WebForms, WebPages and MVC.

Feel free to recommend cool NuGet libraries in the comments and I'll add them to what I expect will be a very large queue!

Related Links

About Scott

Scott Hanselman is a former professor, former Chief Architect in finance, now speaker, consultant, father, diabetic, and Microsoft employee. He is a failed stand-up comic, a cornrower, and a book author.

facebook bluesky subscribe
About   Newsletter
Hosting By
Hosted on Linux using .NET in an Azure App Service

Transferring/Moving a VHD from Windows Virtual PC (Windows XP Mode) to another computer

March 06, 2011 Comment on this post [4] Posted in Tools
Sponsored By

One of the great things about Windows 7 is "Windows XP Mode" which is basically that you get a copy of Windows XP that runs under Windows Virtual PC. It can run "seamlessly" which means you can run XP apps within the VM under Windows 7 with complete compatibility and it looks like the apps are running under Windows 7 itself. They are in the Start Menu and you don't have a "VM Window" like you usually see.

However, in order to save disk space and allow folks to have a base image and multiple XP images, the default disk setting for XP Mode is "differencing." That means that there's a base Windows XP Mode "base" VHD file in "C:\Program Files\Windows XP Mode\Windows XP Mode base.vhd." This file is the base that your instance of Windows XP is, ahem, based on.

If you want to move your Windows XP Mode Virtual Machine to another box, as I did tonight, you might get an error like:

...one of the parent hard disks is missing...

This means that the VM you moved can't find the base disk.

So the question is, how can you make your Windows XP Mode VHD more portable?

First, shut down your VM. Don't hibernate it, actually shut it down. They really want you to hibernate. To shut down, launch the main virtual machine and click the Ctrl+Alt+Del top level menu item, then select Shut Down.

Shutting down Windows XP Mode

Next, go to the Virtual Machines folder. I do this by typing "virtual" in the search box at the Start Menu. Confirm you are really powered down.

image

Next, right click your VM and select Settings, then click the Hard Disk 1 option on the left.

Windows XP Mode - Windows Virtual PC Settings

See how it has a Virtual hard disk file then a Parent Disk? Now click Modify.

Modify virtual hard disk - Merge

From this dialog, click Merge. We are going to Merge the two disks into one disk so we can move it to another machine.

You can choose to do this in place, or make a new file somewhere, which is what I did.

Modify virtual hard disk

Note that if you change the name of your VHD file, you may need to hook it up again in your VMC file (your Virtual Machine settings) when you move your disk to the other machine. Alternatively, you can open up the .vmc file in notepad and carefully change the name of the VHD it thinks it's pointing two in two places.

Last note, you'll likely be prompted for a Name and Password to log into your Windows XP VM on your new machine. You'll need to remember your password, but chances are your username is XPMUser. That's tricky.

Hope this helps.

Related Links

About Scott

Scott Hanselman is a former professor, former Chief Architect in finance, now speaker, consultant, father, diabetic, and Microsoft employee. He is a failed stand-up comic, a cornrower, and a book author.

facebook bluesky subscribe
About   Newsletter
Hosting By
Hosted on Linux using .NET in an Azure App Service

This Developer's Life 1.1.4 - Obsession

March 05, 2011 Comment on this post [1] Posted in Podcast
Sponsored By

14-lead

In this episode we have our first listener-submission: Rob Sullivan talks about his obsessive-ness and how it helps him, and hinders him in his job. Rory Blyth and Scott then talk openly about Rory's compulsion to keep learning - which leads him to, among other things, stop policemen in the street and ask them about take-downs.

Download Here

In this episode we talk to 2 developers who harness their obsessive tendencies to further themselves in their career.

You can download the MP3 here (46 minutes) and visit our site at http://thisdeveloperslife.com.

Please consider subscribing with iTunes, or Zune.

Or if you have a BitTorrent client and would like to help save us bandwidth money, as well as the bragging rights of downloading legal torrents via RSS, get our Torrent Feed at ClearBits.

Also, please do REVIEW our show on iTunes.

The bandwidth and other costs for this week's show were picked up DevExpress and CodeRush!

DX_Slogan_350

Announcing our listener contest...This Developer's Life - Crowdsourced 1

Oh yes. We want to hear your stories. Record your best developer stories and send them to us and if we think they rock, we'll include them in the next episode of This Developer's Life.

What we need from you:

  • Your story. We don't want interviews, we want stories. Tell us about your passion, or something crazy that happened at work while solving some technical problem.
  • Keep your audio clean. Use a decent microphone or at least make sure you don't "overdrive" your microphone by talking to close or two loudly. Don't record while mowing the lawn and don't record in a giant echo chamber.
  • Be passionate. Talk to us like you're talking to a friend.
  • Don't worry about editing or music. Just share. We'll handle the Lady Gaga mashups.
  • Note we may move your audio around or change the order of stuff to make it more listenable or interesting or both.
  • Change the names of companies and people to protect the innocent (or guilty)
  • Know that by giving us your audio you're releasing it the Creative Commons and that we may or may not use it for a future show.

Send us a link to your audio file and what you're talking about and we'll do the rest. See you next time!

About Scott

Scott Hanselman is a former professor, former Chief Architect in finance, now speaker, consultant, father, diabetic, and Microsoft employee. He is a failed stand-up comic, a cornrower, and a book author.

facebook bluesky subscribe
About   Newsletter
Hosting By
Hosted on Linux using .NET in an Azure App Service

Disclaimer: The opinions expressed herein are my own personal opinions and do not represent my employer's view in any way.