Upgrading the DakBoard Family Calendar with Raspberry Pi Zero W and Read Only filesystem
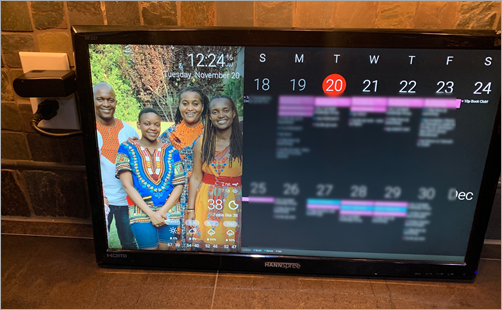
 Earlier this week I built a Family Calendar using a used flat screen monitor and a Raspberry Pi 3 I had lying around and documented it in my post How to build a Wall Mounted Family Calendar and Dashboard with a Raspberry Pi and cheap monitor.
Eric Brown added two great comments (the comments on my blog are always better than the content!) He said:
- You can save power & money by using an Pi Zero W instead.
- This is likely overkill, but I took the time to get the Pi Zero to mount the SD card read-only and do all the writes to a RAM disk.
Eric said "RPis are surprisingly sensitive to power glitches, and will often corrupt the SD card" and that "after mounting the SD read-only, my DakBoard has been running stably for months; before doing that, it corrupted the SD card within 6 weeks."
While I haven't had any issues with my Raspberry Pis, this seemed like a fun "version 2" of the calendar to make with the kids. Worst case scenario? Now I have LCD family calendars!
You'll recall I commented about how important the Spouse Acceptance Factor is whenever introducing new technology into the house.
It has to just work. If my Spouse doesn't like the idea or find its not reliable, the SAF (Spouse Acceptance Factor) will be low and they'll want to get rid of it. All it takes is one "why isn't this working" and I'm dead in the water.
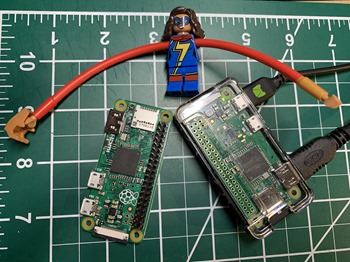
I checked Amazon and found a number of Raspberry Pi Zero W (W is for Wireless, important!) Kits for around US$20. You can see in the picture above how SMALL a Raspberry Pi Zero W is (with LEGO Miss Marvel for scale).
Get the HDMI cables as flush an sanitary as possible
If you have the cables, power supplies, and don't need the headers and extra stuff, I've seen them as low as $10. It's very important to note that a Raspberry Pi Zero W does support HDMI but it has a MINI-HDMI female connector. You'll need a mini-HDMI to HDMI adapter or a mini-HDMI to HDMI short cable.
Here's another aside. Did you know there are a LOT of different HDMI connector orientations? Sure, you could just loop a big old 6 foot HDMI cable back there, but where's the fun in that? There are micro HDMI D1,D2,D3 that describe 90 degree and 270 degree rotations of the male. If you want to be really flush, consider a cable (for example like a C2 to A2) that is usually used in drones. This would allow you to mount the Pi Zero W flush against the back of the monitor - or even better, inside the monitor or a wooden picture frame!
Get the Raspberry Pi Zero W on your wireless and avoid the trouble of keyboards and mice!
Pi Zero Ws are so small that they don't have a regular USB connector. There is one for power and one that is "USB OTG." If you want to connect a mouse and keyboard directly to the Zero you'll need this USB OTG Micro to Type A Cable and/or a powered USB hub.
OR!
Save money and prep your Raspberry Pi Micro SD Card with SSH turned on by default and your Wireless Network enabled by default! Then you can set it up remotely as a DakBoard/MagicMirror Family Calendar.
- Download the Image for Raspbian Stretch. You'll want the desktop version (not Lite) because this IS a visual project, not a headless one!
- I recommend Etcher for burning images to SD Cards. It's free.
- Raspberry Pi Zero W and a 1A+ micro USB power supply
- Cheap micro SD Card. They should include an adapter to plug it into your main computer to prepare.
- Create an empty file called "ssh" on the prepared Micro SD Card before you put the card in the Raspberry Pi
- Make a file called wpa_supplicant.conf with Linux line feeds (LF, not the default Windows CR/LF) with content like this (and your own country code)
country=us
update_config=1
ctrl_interface=/var/run/wpa_supplicant

network={
 scan_ssid=1
 ssid="YourNetworkSSID"
 psk="NETWORKPASSWORD!"
}
This will cause the Pi to get on the network on boot up which should allow you to SSH over to it directly, thereby avoiding any trouble with keyboards and mice and the Pi Zero W.
If you DO end up wanted to connect the keyboard and mouse, you'll want a keyboard/mouse setup that is all in one with just one USB adapter or you'll need a Powered USB Hub. This should be temporary as you get the Pi prepared.
Make the Raspberry Pi Zero W readonly - after it's been configured with DakBoard
Once I had the Pi Zero W all prepared I went around the net looking for tutorials to make it readonly. You're basically causing Linux to mount the SD Card readonly and then do all writes to a RAM Disk that will ultimately be tossed whenever you (rarely) reboot. Get it perfect before you go readonly as it's a small hassle to switch back. Or you can pull the card out and mount it on your other computer then return it. Still, not awesome.
Eric from the comments pointed me to a Raspberry Pi Jesse tutorial, but I tried it and it didn't work for me, likely because I'm on Raspbian Stretch, a newer version. There's a LOT of choices and ways to do this but the best tutorial I found was on the page for Domoticz, a n open source Home Automation system which looks, as an aside, awesome and something I need to check out in the future!
For now, I followed these instructions on Setting up overlayFS on Raspberry PI (the "overlay" being the file system you'll write to but it's a fake, the writes are going to one folder and the two foldkers (one read-write and one read-only are overlaid over each other). This allowed me to make a Raspberry Pi Raspbian Stretch system Readonly on my Pi Zero W.
I followed the instructions exactly, only skipping the parts like "Modify domoticz service" that didn't apply. When I run "mount" I can see the main file system is read-only and the others are overlaid and read-write.
pi@dakboard2:~ $ mountSo far so good! This will make a smaller and lower power Family Calendar that will hopefully be more reliable as well! Thanks Eric from the comments!
/dev/mmcblk0p7 on / type ext4 (ro,noatime,data=ordered)
snip!
ramdisk on /var_rw type tmpfs (rw,relatime)
ramdisk on /home_rw type tmpfs (rw,relatime)
overlay on /home type overlay (rw,relatime,lowerdir=/home_org,upperdir=/home_rw/upper,workdir=/home_rw/work)
overlay on /var type overlay (rw,relatime,lowerdir=/var_org,upperdir=/var_rw/upper,workdir=/var_rw/work)
Sponsor: Preview the latest JetBrains Rider with its Assembly Explorer, Git Submodules, SQL language injections, integrated performance profiler and more advanced Unity support.
About Scott
Scott Hanselman is a former professor, former Chief Architect in finance, now speaker, consultant, father, diabetic, and Microsoft employee. He is a failed stand-up comic, a cornrower, and a book author.
About Newsletter
Do you have any pictures of the back of the monitor? What case do you have for the Pi Zero? How did you mount it, double-sided tape?
FYI: Adafruit provides a read-only Pi recipe here based upon Raspbian Lite. What's cool about this one is that it allows booting into RW mode using a jumper, just in case you want to make changes to the filesystem (eg. apply updates/patches, etc). Enjoy!
I have a standalone webpage for monitoring webcams. The page never changes and just pulls the feeds from 8 IP based cameras in the building. I have been tired of wasting a full PC just to view that same HTML document. Maintenance of Fans and power supplies is a nightmare!
This setup will replace a $200 PC with a $25 setup (PIZero, SD Card, and Power Pack.)
The only issue I see for my use case is if the PIZero's network interface can't handle the bandwidth, I may need to try the PI3A model just out as the Wifi interface seems a bit more robust on it.
Thanks!!!
Comments are closed.


I have added a PIR which turns the screen on when movement is detected and turns it off after two minutes of no movement. The code is on Github.