Scott Hanselman

ASP.NET 5 (vNext) Work in Progress - Exploring TagHelpers

November 20, 2014 Comment on this post [142] Posted in ASP.NET | ASP.NET MVC
Sponsored By

TagHelpers are a new feature of ASP.NET 5 (formerly and colloquially ASP.NET vNext) but it's taken me (and others) some time to fully digest them and what they mean.

Note that this, and all of ASP.NET 5 is a work in progress. TagHelpers can and will change. There is NO tooling support in Visual Studio for them, as they are changing day to day, so just be aware. That's why this post (and series is called Work in Progress.)

Historically we've used HtmlHelpers within a Razor View, so when you wanted a Label or a TextBox you'd do this. This is from the ASP.NET 5 Starter Web example.

<li>@Html.ActionLink("Home", "Index", "Home")</li>

There you have some HTML, then we start some C# with @ and then switch out. It's inline C#, calling a function that will return HTML.

Here's the same thing, using a TagHelper.

<li><a controller="Home" action="Index">Home</a></li>

The source for TagHelpers is (as with all ASP.NET source) up on GitHub, here. This is an anchor, A, so it'll be in AnchorTagHelper. The code is very simple, in fact, gets a collection of attributes and decides which to act upon.

In this case, "controller" and "action" are not HTML5 attributes, but rather ones that ASP.NET is looking for.

Question for You - Would you rather have these attributes and ones like them (including your own) be prefixed? Perhaps asp:controller or asp-controller? That's an open issue you can comment on! You could do [HtmlAttributeName("asp:whatever")] on a property or [TagName("foo")] for a tag if you liked.

How do these attributes get mapped to a TagHelper? Well, an attribute name is mapped directly to a C# property and automatically injected. See how AnchorTagHelper has public properties Action and Controller?

It's important to note that this isn't the second coming of WebForms controls, while the possible asp:foo syntax may look familiar (even though a prefix is optional.) This is more like syntactic sugar that gives you a compact way to express your intent. It doesn't give you any "control lifecycle" or anything like that.

Personally, I'd love to see them look different in the editor. For example, rather than

Tag Helpers

I'd like to see italics, or maybe a desaturation to show what's server-side and what's not, which will be super important if I'm NOT using a prefix to distinguish my attributes.

Tag Helpers, desaturated

The code below in this Before and After results in the same HTML and the same behavior. A nice aspect of TagHelpers it that you avoid the context switch from markup to C#.

Here is another example, a login partial form, before...

@using System.Security.Principal

@if (User.Identity.IsAuthenticated)
{
using (Html.BeginForm("LogOff", "Account", FormMethod.Post, new { id = "logoutForm", @class = "navbar-right" }))
{
@Html.AntiForgeryToken()
<ul class="nav navbar-nav navbar-right">
<li>
@Html.ActionLink("Hello " + User.Identity.GetUserName() + "!", "Manage", "Account", routeValues: null, htmlAttributes: new { title = "Manage" })
</li>
<li><a href="javascript:document.getElementById('logoutForm').submit()">Log off</a></li>
</ul>
}
}
else
{
<ul class="nav navbar-nav navbar-right">
<li>@Html.ActionLink("Register", "Register", "Account", routeValues: null, htmlAttributes: new { id = "registerLink" })</li>
<li>@Html.ActionLink("Log in", "Login", "Account", routeValues: null, htmlAttributes: new { id = "loginLink" })</li>
</ul>
}

and after...with the Microsoft.AspNet.Mvc.TagHelpers package added in project.json and then @addtaghelper "MyAssemblyName" in either your ViewStart.cshtml to get this in all views, or separately within a single view page.

@using System.Security.Principal

@if (User.Identity.IsAuthenticated)
{
<form method="post" controller="Account" action="LogOff" id="logoutForm" class="navbar-right">
<ul class="nav navbar-nav navbar-right">
<li>
<a controller="Account" action="Manage" title="Manage">Hello @User.Identity.GetUserName()!</a>
</li>
<li><a href="javascript:document.getElementById('logoutForm').submit()">Log off</a></li>
</ul>
</form>
}
else
{
<ul class="nav navbar-nav navbar-right">
<li><a id="registerLink" controller="Account" action="Register">Register</a></li>
<li><a id="loginLink" controller="Account" action="Login">Log in</a></li>
</ul>
}

This makes for much cleaner markup-focused Views. Note that this Sample is a spike that Damian Edwards has on his GitHub, but you have TagHelpers in the Beta 1 build included with Visual Studio 2015 preview or OmniSharp. Get involved!

Remember also to check out http://www.asp.net/vnext and subscribe to my YouTube Channel and this playlist of the ASP.NET Weekly Community Standup. In this episode we talked about TagHelpers in depth!

Related Posts

About Scott

Scott Hanselman is a former professor, former Chief Architect in finance, now speaker, consultant, father, diabetic, and Microsoft employee. He is a failed stand-up comic, a cornrower, and a book author.

facebook bluesky subscribe
About   Newsletter
Hosting By
Hosted on Linux using .NET in an Azure App Service

Announcing .NET 2015 - .NET as Open Source, .NET on Mac and Linux, and Visual Studio Community

November 12, 2014 Comment on this post [197] Posted in ASP.NET | ASP.NET MVC | Open Source | VS2015
Sponsored By

It's happening. It's the reason that a lot of us came to work for Microsoft, and I think it's both the end of an era but also the beginning of amazing things to come.

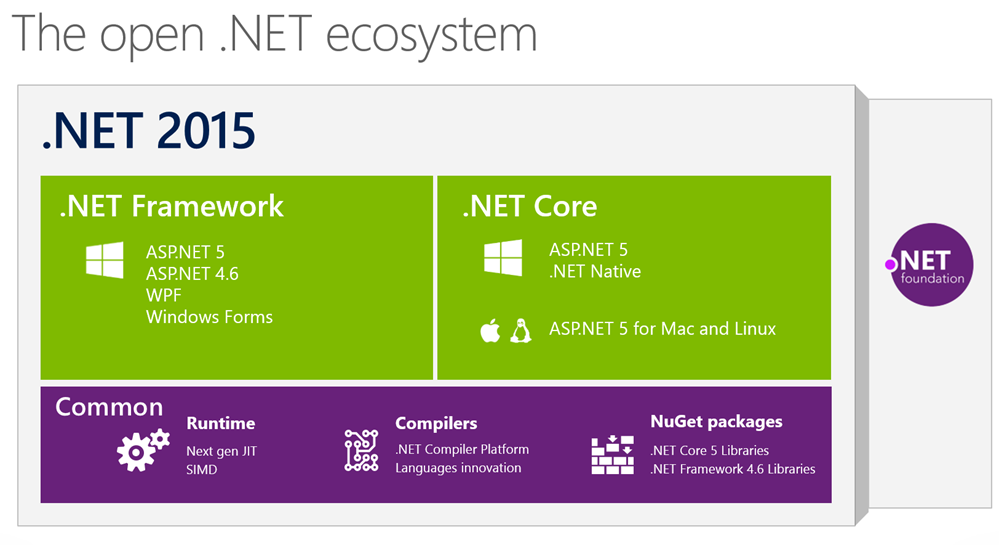
The .NET 2015 wave of releases is upon us. Here's what's happening and we announced it today in New York. There's a lot here, so drink it all in slowly.

Be sure to check out all the blog posts I'm linking to at the end, but here's my personal rollup and take on the situation.

  • We are serious about open source and cross platform.
    • .NET Core 5 is the modern, componentized framework that ships via NuGet. That means you can ship a private version of the .NET Core Framework with your app. Other apps' versions can't change your app's behavior.
    • We are building a .NET Core CLR for Windows, Mac and Linux and it will be both open source and it will be supported by Microsoft. It'll all happen at https://github.com/dotnet.
    • We are open sourcing the RyuJit and the .NET GC and making them both cross-platform.
  • ASP.NET 5 will work everywhere.
    • ASP.NET 5 will be available for Windows, Mac, and Linux. Mac and Linux support will come soon and it's all going to happen in the open on GitHub at https://github.com/aspnet.
    • ASP.NET 5 will include a web server for Mac and Linux called kestrel built on libuv. It's similar to the one that comes with node, and you could front it with Nginx for production, for example.
  • Developers should have a great experience.
    • There is a new FREE SKU for Visual Studio for open source developers and students called Visual Studio Community. It supports extensions and lots more all in one download. This is not Express. This is basically Pro.
    • Visual Studio 2015 and ASP.NET 5 will support gulp, grunt, bower and npm for front end developers.
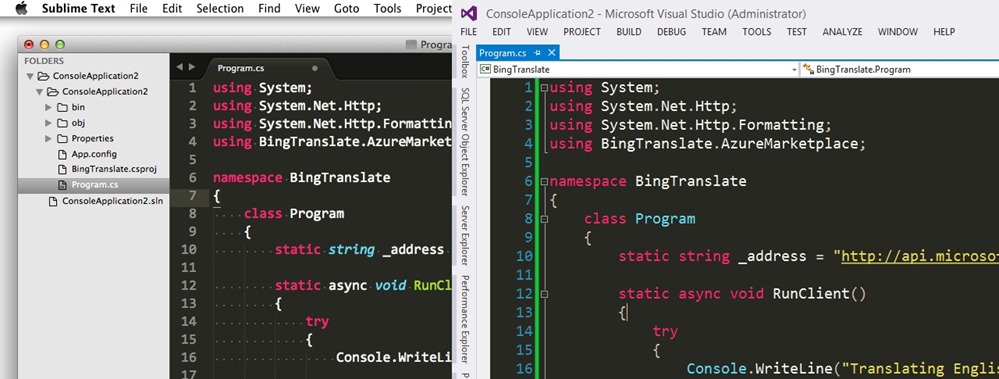
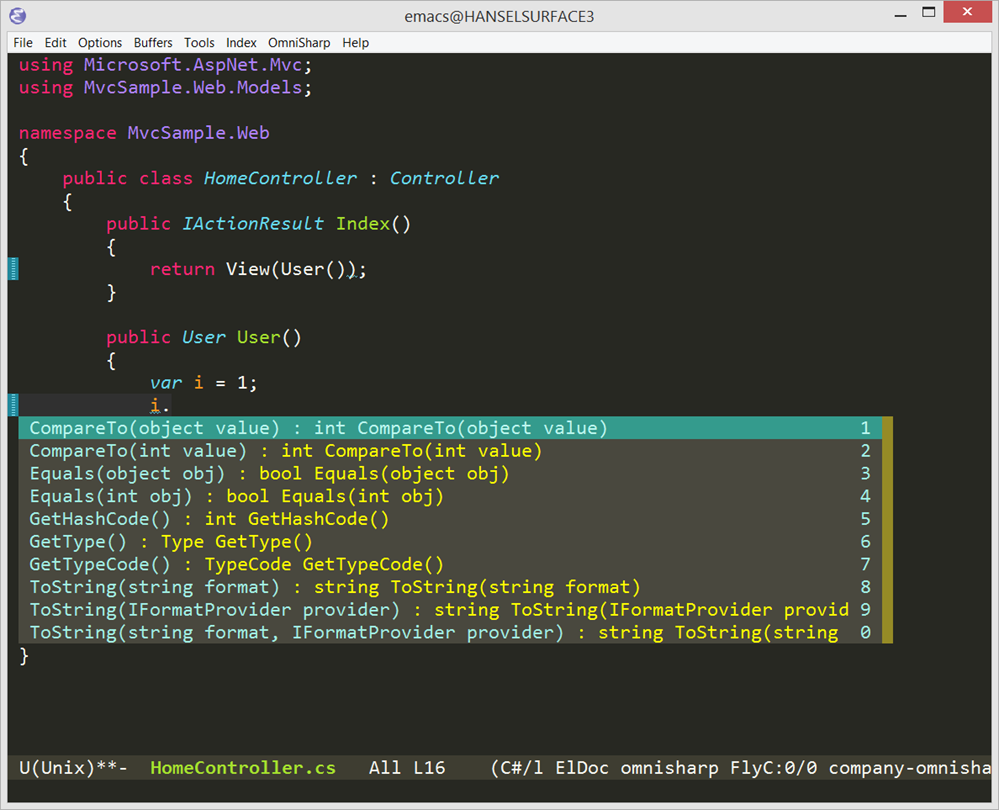
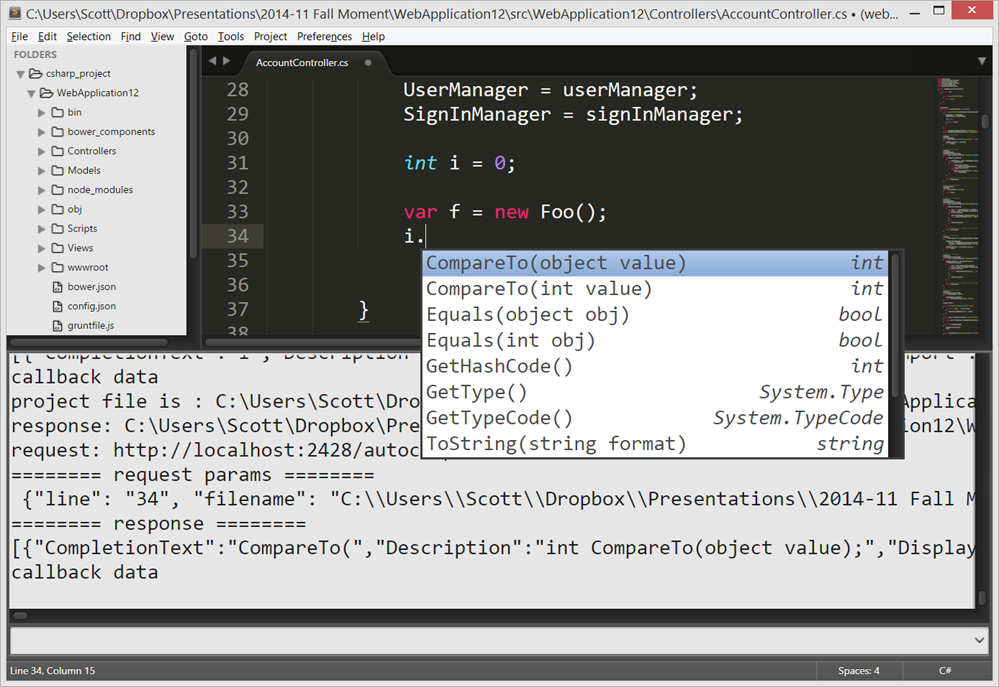
    • A community team (including myself and Sayed from the ASP.NET and web tools team) have created the OmniSharp organization along with the Kulture build system as a way to bring real Intellisense to Sublime, Atom, Brackets, Vim, and Emacs on Windows, Linux, and Mac. Check out http://www.omnisharp.net as well as blog posts by team members Jonathan Channon
  • Even more open source.
    • Much of the .NET Core Framework 4.6 and its Reference Source source is going on GitHub. It's being relicensed under the MIT license, so Mono (and you!) can use that source code in their .NET implementations.
    • There's a new hub for Microsoft open source that is hosted GitHub at http://microsoft.github.io.

Open sourcing .NET makes good sense. It makes good business sense, good community sense, and today everyone at Microsoft see this like we do.

Open .NET

Related Links


Sponsor: Big thanks to Aspose for sponsoring the feed this week! Working with Files? Aspose.Total for .NET has all the APIs you need to create, manipulate and convert Microsoft Office documents and many other formats in your applications. Start a free trial today.

About Scott

Scott Hanselman is a former professor, former Chief Architect in finance, now speaker, consultant, father, diabetic, and Microsoft employee. He is a failed stand-up comic, a cornrower, and a book author.

facebook bluesky subscribe
About   Newsletter
Hosting By
Hosted on Linux using .NET in an Azure App Service

NuGet Package of the Week - Courtesy Flush to flush buffers earlier and optimize time to first byte

November 06, 2014 Comment on this post [24] Posted in ASP.NET | ASP.NET MVC | NuGet | NuGetPOW
Sponsored By

Yes, really. It's got to be the best name for an open source library out there. It's a great double entendre and a great name for this useful little library. Perhaps English isn't your first language, so I'll just say that a courtesy flush gives the next person a fresh bowl. ;)

However, in the computer world "flushing a buffer" means forcing a buffer to be moved along, usually to a file or the network. Rather than holding data, you flush it, and move it along.

Nik from Glimpse has a small NuGet package called Courtesy Flush. He's got a good write-up on his blog.

image

It's a library to enable easier flushing of your buffer in ASP.NET MVC. From their site:

Why Flush Early?

Flushing early can provide performance improvements in web applications and has been a recomended best practice in the web performance community since 2007.

To find out more, check out Nik's blog where he covered the benefits of flushing early in two posts:

It builds on top of ASP.NET ActionFilters, which you can apply as attributes to your methods, or call within controllers.

Let's say that you have some server-side work that's very slow. That slow operation could hold up the rendering of your page until it completes. With a pre-flush like this you can get bytes onto the network and into the user's browser faster.

Here we render some information and get it out fast before we do something that's unavoidably slow.

public ActionResult About()
{
ViewBag.Title = DateTime.Now.Second;
this.FlushHead();

Thread.Sleep(2000);
ViewBag.Message = "Your application description page.";

return View();
}

Let's think about really specifically. It's important to know WHY you would want to do this and what exactly happens in the browser.

If you have a long running, but important process (we are pretending that Thread.Sleep(2000) is important) that takes 2 seconds, no HTML is sent to the browser. It's just waiting. The timeline looks like this:

Here we didn't flush

See that blue line? We waited almost 5 seconds for the /about page, and while we were waiting, no Javascript and no CSS were being loaded. Why not? How could the browser know if it isn't seen the <head> of your HTML?

For an optimization, we could FLUSH the buffers that we have up to this point, putting the HTML that we have so far onto the network.

The Layout.cshtml we have a call to @Html.FlushHead() to get the the _Head.cshtml out and into the hands of the browser. It might look like this:

<!DOCTYPE html>
<html>
<head>
<meta charset="utf-8" />
<meta name="viewport" content="width=device-width, initial-scale=1.0">
@if (ViewBag.Description != null)
{
<meta name="description" content="@ViewBag.Description">
}
<title>@ViewBag.Title - My ASP.NET Application</title>
@Styles.Render("~/Content/css")
@Scripts.Render("~/bundles/modernizr")
</head>

Here's what the SAME page looks like with the <head> flushed out first.

Here we flushed

Look closely at the timeline. Here, I'll do it for you...below shows when we flushed early versus just waiting.

See how when we flushed the head it gave the browser enough information to stat loading some css and javascript we had in the <head?> The whole page took 5 seconds, but when we flush at least we get things going early, while when we don't flush we can't do a thing until the long running task finishes.

See the difference?

See the difference? Now, to be clear, don't blindly go and add optimizations without reading the code and understanding what's going on, but this is a nice tool for our ASP.NET toolbox.

We may see a similar but even more powerful technique in ASP.NET vNext that includes async flushes at multiple points, while updating the model as data is available.


Sponsor: Big thanks to Aspose for sponsoring the feed this week! Working with Files? Aspose.Total for .NET has all the APIs you need to create, manipulate and convert Microsoft Office documents and many other formats in your applications. Start a free trial today.

About Scott

Scott Hanselman is a former professor, former Chief Architect in finance, now speaker, consultant, father, diabetic, and Microsoft employee. He is a failed stand-up comic, a cornrower, and a book author.

facebook bluesky subscribe
About   Newsletter
Hosting By
Hosted on Linux using .NET in an Azure App Service

Enabling Websockets for Socket.io Node apps on Microsoft Azure

November 03, 2014 Comment on this post [13] Posted in Azure | Diabetes | nodejs | Open Source
Sponsored By

Whoa my Blood Sugar is a CGM in the Cloud!NOTE: This is a technical post, I'll blog more about Nightscout later this week. Subscribe and watch for my take, or visit http://www.nightscout.info.

I'm running an application called Nightscout that is a node app with a MongoDB backend that presents a JSON endpoint for a diabetic's blood sugar data. I use my Dexcom G4 CGM (Continuous Glucose Meter) connected with a micro-USB OTG cable to an Android phone. An Android app bridges the device and POSTs up to the website.

Azure is well suited to run an app like this for a few reasons. Node works great on Azure, MongoLabs is setup in the Azure Store and has a free sandbox, Azure supports WebSockets, and *.azurewebsites.net has a wildcard SSL cert, so I could force SSL.

Enabling Websockets and Forcing SSL

So my goal here is to do two things, make sure Websockets/socket.io is enabled in my app because it's been using polling, and force my app to use SSL.

Setting up a node.js site on Azure is very easy. You can see a 3 minute video on how to do a Git Deploy of a node app here. Azure will see that there's a app.js or server.js and do the right thing.

However, because IIS and node are working together to host the site (IIS hands off to node using a thing called, wait for it, iisnode) you should be aware of the interactions.

There's a default web.config that will be created with any node app, but if you want to custom stuff like rewrites, or websockets, you should make a custom web.config. First, you'll need to start from the web.config that Azure creates.

Related Link:  Using a custom web.config for Node apps

Let's explore this web.config so we understand what's it's doing so we can enable Websockets in my app. Also, note that even though our project has this web.config in our source repository, the app still works on node locally or hosts like Heroku because it's ignored outside Azure/IIS.

  • Note that we say "webSocket enabled=false" in this web.config. This is confusing, but makes sense when you realize we're saying "disable Websockets in IIS and let node (or whomever) downstream handle it"
  • Note in the iisnode line you'll put path="server.js" or app.js or whatever. Server.js appears again under Dynamic Content to ensure node does the work.
  • I added NodeInspector so I can do live node.js debugging from Chrome to Azure.
  • Optionally (at the bottom) you can tell IIS/Azure to watch *.js files and restart the website if they change.
  • We also change the special handling of the bin folder. It's not special in the node world as it is in ASP.NET/IIS.
<?xml version="1.0" encoding="utf-8"?>
<!--
This configuration file is required if iisnode is used to run node processes behind
IIS or IIS Express. For more information, visit:

https://github.com/tjanczuk/iisnode/blob/master/src/samples/configuration/web.config
-->

<configuration>
<system.webServer>
<!-- Visit http://blogs.msdn.com/b/windowsazure/archive/2013/11/14/introduction-to-websockets-on-windows-azure-web-sites.aspx for more information on WebSocket support -->
<webSocket enabled="false" />
<handlers>
<!-- Indicates that the server.js file is a node.js site to be handled by the iisnode module -->
<add name="iisnode" path="server.js" verb="*" modules="iisnode"/>
</handlers>
<rewrite>
<rules>
<!-- Do not interfere with requests for node-inspector debugging -->
<rule name="NodeInspector" patternSyntax="ECMAScript" stopProcessing="true">
<match url="^server.js\/debug[\/]?" />
</rule>

<!-- First we consider whether the incoming URL matches a physical file in the /public folder -->
<rule name="StaticContent">
<action type="Rewrite" url="public{REQUEST_URI}"/>
</rule>

<!-- All other URLs are mapped to the node.js site entry point -->
<rule name="DynamicContent">
<conditions>
<add input="{REQUEST_FILENAME}" matchType="IsFile" negate="True"/>
</conditions>
<action type="Rewrite" url="server.js"/>
</rule>
</rules>
</rewrite>

<!-- 'bin' directory has no special meaning in node.js and apps can be placed in it -->
<security>
<requestFiltering>
<hiddenSegments>
<remove segment="bin"/>
</hiddenSegments>
</requestFiltering>
</security>

<!-- Make sure error responses are left untouched -->
<httpErrors existingResponse="PassThrough" />

<!--
You can control how Node is hosted within IIS using the following options:
* watchedFiles: semi-colon separated list of files that will be watched for changes to restart the server
* node_env: will be propagated to node as NODE_ENV environment variable
* debuggingEnabled - controls whether the built-in debugger is enabled

See https://github.com/tjanczuk/iisnode/blob/master/src/samples/configuration/web.config for a full list of options
-->
<!--<iisnode watchedFiles="web.config;*.js"/>-->
</system.webServer>
</configuration>

Next, turn on Websockets support for your Azure Website from the configure tab within the Azure Portal:

Turn on Websockets in the Azure Portal

Now I need to make sure the node app that is using socket.io is actually asking for Websockets. I did this work on my fork of the app.

io.configure(function () {
- io.set('transports', ['xhr-polling']);
+ io.set('transports', ['websocket','xhr-polling']);

It turns out the original author only put in one option for socket.io to try. I personally prefer to give it the whole list for maximum compatibility, but in this case, we clearly need Websockets first. When will Websockets fall back if it's unavailable? What Azure website pricing plans support WebSockets?

  • Free Azure Websites plans support just 5 concurrent websockets connections. They're free. The 6th connection will get a 503 and subsequent connections will fallback to long polling. If you're doing anything serious, do it in Shared or above, it's not expensive.
  • Shared Plans support 35 concurrent websockets connections, Basic is 350, and Standard is unlimited.

You'll usually want to use SSL when using Websockets if you can, especially if you are behind a proxy as some aggressive proxies will strip out headers they don't know, like the Upgrade header as you switch from HTTP to Websockets.

However, even free Azure websites support SSL under the *.azurewebsites.net domain, so doing development or running a small site like this one gets free SSL.

I can force it by adding this rule to my web.config, under <system.webServer>/<rewrite>/<rules/>:

<rule name="Force redirect to https">
<match url="(.*)"/>
<conditions>
<add input="{HTTP_HOST}" pattern=".+\.azurewebsites\.net$" />
<add input="{HTTPS}" pattern="Off"/>
<add input="{REQUEST_METHOD}" pattern="^get$|^head$" />
</conditions>
<action type="Redirect" url="https://{HTTP_HOST}/{R:1}"/>
</rule>

Note the pattern in this case is specific to azurewebsites.net, and will take any Azure website on the default domain and force SSL. You can change this for your domain if you ike, of course, assuming you have an SSL cert. It's a nice feature though, and a helpful improvement for our diabetes app.

I can confirm using F12 tools that we switched to WebSockets and SSL nicely.

image

The whole operation took about 15 minutes and was a nice compatible change. I hope this helps you out if you're putting node.js apps on Azure like I am!


Sponsor: Big thanks to Aspose for sponsoring the feed this week! Working with Files? Aspose.Total for .NET has all the APIs you need to create, manipulate and convert Microsoft Office documents and many other formats in your applications. Start a free trial today.

About Scott

Scott Hanselman is a former professor, former Chief Architect in finance, now speaker, consultant, father, diabetic, and Microsoft employee. He is a failed stand-up comic, a cornrower, and a book author.

facebook bluesky subscribe
About   Newsletter
Hosting By
Hosted on Linux using .NET in an Azure App Service

Building a working Robot controlled by a C#, an iPhone, and Monkey.Robotics

October 28, 2014 Comment on this post [24] Posted in Learning .NET | Open Source
Sponsored By

Robot_TinyThis year at Xamarin's Evolve there was a Robot Building area that introduced a new beta platform called Monkey.Robotics (GitHub). There is a disclaimer on the GitHub: "Monkey.Robotics is still a beta/work in progress and is not officially supported by Xamarin" but I can say that I was able to successfully build this robot with my 6 year old and we've had a blast driving it around the house! He was thrilled to solder (but not too much) and setup all the wires on the breadboard.

This robot is a great showcase for the larger Monkey.Robotics stack PLUS a great way to learn how to use Xamarin tools AND the .NET Micro Framework. And the end you'll have not just a robot with code running on a Netduino, but also have deployed C# code using Xamarin onto (in my case) an iPhone.

The resulting stuff you get to build and use are:

  • iPhone/Android app using Xamarin.Forms and controls or a gyroscope talking over your phone's Bluetooth radio to some code running on an...
  • Netduino running the open source .NET Micro Framework. This Netduino will receive communications via a Bluetooth radio on a chip. This BT LE board is connected to the GPIO (general purpose input output) pins on the Netduino. The board then controls...
  • Motors and wheels on a nice base, powered by 4 AA batteries.

The authors are some of my favorite people, including Bryan Costanich, Frank Krueger, Craig Dunn, David Karlas, and Oleg Rakhmatulin.

There's a deceptively large amount of code here and it's whole job is to hide the yucky parts of a project that connects mobile devices to wearables, sensors, peripherals, and low-level communication. They include a cross-platform API for talking with BLE (Bluetooth Low-Energy) devices, as well as the beginnings of a similar API over Wifi. Even more important is a higher level messaging framework sitting on top of these lower=level APIs. The net result is that talking Bluetooth between your phone and a device isn't very hard.

On the device side (in my case with .NET Micro Framework) they make things more compose-able with "blocks and scopes" style abstractions, allowing one to fairly easily connect output pins (LEDs, motors) to input pins (buttons, sensors).

Here is one of their basic examples. This makes an LED blink when a button is pressed.

public class Program
{
static H.Cpu.Pin buttonHardware = Pins.ONBOARD_BTN;
static H.Cpu.Pin ledHardware = Pins.ONBOARD_LED;

public static void Main()
{
var button = new DigitalInputPin (buttonHardware);
var led = new DigitalOutputPin (ledHardware);

button.Output.ConnectTo (led.Input);

// keep the program alive
while (true) {
System.Threading.Thread.Sleep (1000);
}
}
}

I went through the very excellent Project Walkthrough on building a Robot. Note that all this is on GitHub so if you have any issues, you can fix them and submit a pull request. I'm sure the project would appreciate it!

Architectural_Overview

Here's what you need to buy/or have (I took from their GitHub site) if you want to build this same robot.

  • bot Chassis w/Motors - Just about any 2 wheeled robot chassis with motors and gears will work, but we like these. They're only $11 and they work well. Spark Fun also makes a similar robot chassis for $15, but the battery holder is difficult to access, otherwise, it's also very nice.
  • Netduino 2 - From Secret Labs, the Netduino is a programmable micro controller that runs the .NET Micro Framework.
  • BLE Mini - From Redbear Labs. Used to communicate with the robot from Xamarin.iOS and Xamarin.Android.
  • 400 Point Breadboard - The breadboard is where our electronics will all get connected. It has holes in it to put chips, sensors, wires, etc., into.
  • Breadboard Wiring Kit - Any wiring kit will work, but we especially like these. You may also want to get some male-to-male flexible jumper wires.
  • Dual H-Bridge Chip - Used to power the motors, H-bridges are simple chips that allow you to control motors with external power, so you don't burn out your Netduino trying to drive them with that. :) You can also build an H-bridge with some simple components, but buying a chip is easier and will likely cost about the same.
  • iOS or Android Device w/BLE Support - If using an iOS device, you'll need an iPhone 4 or later. If using an Android Device, you'll want to make sure that it has BLE support and is running at least Android v4.3.

Make sure you have you development and build environment setup, and then follow the guides below to get this thing up and running!

Basically you'll need Xamarin Studio or Visual Studio with Xamarin Tools. You'll also need the .NET Micro Framework bits, which are free for Visual Studio 2013, as well as the Netduino 4.3.1 SDK. There's a thread over at the Netduino Forums if you have trouble getting your device ready. I had no issues at all.

The Robot code is in a larger solution called Robotroller that's pretty nicely factored. You've got the Core functionality for the phone and the Core for the Robot.

The Phone code makes great use of databinding. The Car code is a little messy (it's beta and looks like Tests that turned into a working Robot! ) but it worked out of the box! It's surprisingly simple, in fact, due to the next abstraction layer provided by Monkey.Robotics.

How cool is this. That's basically it. Love it.

public class TestRCCar
{
public static void Run ()
{
// initialize the serial port for COM1 (using D0 & D1)
// initialize the serial port for COM3 (using D7 & D8)
var serialPort = new SerialPort (SerialPorts.COM3, 57600, Parity.None, 8, StopBits.One);
serialPort.Open ();
var server = new ControlServer (serialPort);

// Just some diagnostic stuff
var uptimeVar = server.RegisterVariable ("Uptime (s)", 0);

var lv = false;
var led = new Microsoft.SPOT.Hardware.OutputPort (Pins.ONBOARD_LED, lv);

// Make the robot
var leftMotor = HBridgeMotor.CreateForNetduino (PWMChannels.PWM_PIN_D3, Pins.GPIO_PIN_D1, Pins.GPIO_PIN_D2);
var rightMotor = HBridgeMotor.CreateForNetduino (PWMChannels.PWM_PIN_D6, Pins.GPIO_PIN_D4, Pins.GPIO_PIN_D5);

var robot = new TwoWheeledRobot (leftMotor, rightMotor);

// Expose some variables to control it
robot.SpeedInput.ConnectTo (server, writeable: true, name: "Speed");
robot.DirectionInput.ConnectTo (server, writeable: true, name: "Turn");

leftMotor.SpeedInput.ConnectTo (server);
rightMotor.SpeedInput.ConnectTo (server);

// Show diagnostics
for (var i = 0; true; i++) {
uptimeVar.Value = i;

led.Write (lv);
lv = !lv;
Thread.Sleep (1000);
}
}
}

Here's a video (don't play it too loud, my kids are yelling in the background) of me controlling the robot using my iPhone. Note I'm using the gyroscope control so I twist my hand to steer.

Robot via iPhone over BT LE. It's @Xamarin on phone plus @SecretLabs and @Xamarin on robot!

A video posted by Scott Hanselman (@shanselman) on

All in all, I'm enjoying Monkey.Robotics and I hope it takes off with more projects, more ideas, more things to build. If you've got interest or expertise in this area, go star their project and get involved! There's a LOT of stuff going on over there, so explore all the docs and diagrams.


Sponsor: Big thanks to my friends at Octopus Deploy. They are the deployment secret that everyone is talking about. Using NuGet and powerful conventions, Octopus Deploy makes it easy to automate releases of ASP.NET applications and Windows Services. Say goodbye to remote desktop and start automating today!

About Scott

Scott Hanselman is a former professor, former Chief Architect in finance, now speaker, consultant, father, diabetic, and Microsoft employee. He is a failed stand-up comic, a cornrower, and a book author.

facebook bluesky subscribe
About   Newsletter
Hosting By
Hosted on Linux using .NET in an Azure App Service

Disclaimer: The opinions expressed herein are my own personal opinions and do not represent my employer's view in any way.